We have added many new homepages, inner pages, and post-type layouts to the demo content.
Wolf Tour Dates plugin will be updated to Wolf Events.
The Wolf Slider plugin will be deprecated in favor of the page builder slider elements and the content block system. It will still be available within the theme for a while.
What You Need to Know Before Updating
Off course, updating is not mandatory but it is recommended.
The new version comes with a plugin to update your content for this new version automatically. However, here are a few recommendations to follow before updating.
Make sure that your WordPress installation is up-to-date
Once it is done, you can run the Force Regenerate Thumbnails plugin to resize all your images to suit the new design.
2. Recommended WordPress Web Hosting
All of our themes require that you have WordPress installed and running on a hosting web account. Selecting your web host is one of the most crucial decisions you will make for your website. It’s essential to choose the right hosting provider.
Here is a list of web hosts recommended by WordPress and that we recommend as well
To use our WordPress Themes, you must be running WordPress 6.0 or higher, PHP 7.4 or higher version, PHP 8 is recommended (read more) and MySQL 7 or higher version. Our themes have been tested on all major browsers. Below is a checklist of items your host needs to comply with to ensure proper operation:
If necessary, you can download the latest release of WordPress from the official WordPress website.
WordPress recommends using PHP 7.4. Our themes work correctly with PHP 7.4+.
However, it is recommended to have PHP 7.4 or even better, PHP 8 running on your server.
PHP Configuration limits
Issues you may encounter, such as demo content fails when importing and similar issues, are generally related to excessively low PHP configuration limit settings. You can either increase these limits on your own or contact your web host and ask to have the limits increased to the following minimums:
Note that the values above are the minimum required. We recommend setting these values higher if possible.
If your web host allows you to overwrite your server PHP settings in a php.ini file, create a file named php.ini, paste the content below in it, and drop it in your wp-admin folder.
If your server is Nginx based, you can follow the same process using a .user.ini file.
Verify your server limits
You can check your Serve Limits in the System Status table if available or by installing the WP-ServerInfo plugin and navigate to “Settings” > “WordPress phpinfo()”. The first column refers to your installation value, and the second column refers to the limits of your host. These values are often lower if you have selected a cheap hosting package.
Some hosts will try to keep PHP limits low to conserve resources. You can always contact your host to ask what the current settings are, and have them adjusted if necessary. Since you are paying for those resources, you should rightfully expect to be getting your money’s worth.
By default, when no page is set in the WordPress “Settings” > “Reading” panel, the last posts are displayed as front page.
But you may want to specify another page for your front page and blog.
To set a page as Front page, go in the WordPress “Settings” > “Reading” panel and set the desired page as “Front page”.
To define a blog page, create a page with no content and assign it as “Posts page”.
5. Low Budget Hosts or Low Settings Servers
On some hosts, like GoDaddy, 1&1 and Hostgator basic plan, you can experience issues as Demo Content import failure, endless loading, incomplete page rendering, etc. All these problems are caused by the fact that the base host plan of these hosts doesn’t meet the minimum Server Requirements to work with a modern WordPress themes. For example, the Memory Limit of these hosts is too low, approximately 40MB. In the official WordPress documentation is suggested at least to use 96MB, even if 64MB are sufficient to run one of our Themes smoothly.
We are sorry for the inconvenience but it really is out the scope of our support and something that is isolated to a low-performance host.
How to increase the limits
Most of the problems are caused by the WP Memory Limit. The WP Memory Limit is the maximum amount of memory (RAM) that your site can use at one time. When you reach your Memory Limit, you’ll encounter a fatal error. Several things consume memory, such as WordPress itself, the theme you’re using, and the plugins installed on your site. Basically, the more content and features you add to your site, the bigger your memory limit has to be.
You can increase/set any PHP parameter with GoDaddy create a new file named php5.ini (if you already have php5.ini edit the file) and add this line to that file. Wait a few minutes to take affect:
Note that this take action if your hosting plan permits to increase values, please note that sometimes the host limit you and even if you update these values the modification does not take action. They are very strict with their memory limit and one of the few hosts that have such a low limit which causes this problem. In case please contact GoDaddy to increase the PHP memory limit.
GoDaddy support team are not always the smartest or going to show you how to do something without trying to up-sell you to a higher price plan. But you must still know that you get what you pay for a hosting service if you are paying an $0.99 cents a month for hosting you probably won’t be able to run a WordPress site with the latest technology. For instance the GoDaddy Ultimate Plan (Unlimited Everything) currently $7.49 per month, can handle about 1 decked out WordPress site with a good theme and plugins. Add more sites then you will need to buy more resources, that is just how it works.
--
To avoid headaches with server-side issues, be sure to check our list of RECOMMENDED WEB HOSTS
6. Stylesheet is missing or Theme Installation fails
A common issue that can occur with users new to installing WordPress themes is a "Broken theme and/or stylesheets missing" error message being displayed when trying to upload or activate the theme.
Be sure to do NOT install the whole downloaded package but only the theme zip file included.
You will find more information to fix this issue here.
Also, be sure that your server fulfills the Server Requirements for the theme.
The theme has been reviewed by ThemeForest and tested by us many times. There is no reason why you couldn't upload it and activate it in your WordPress installation except a server setting issue.
Most of our themes provide a full version of WPBakery Page Builder.
Any time the plugin is updated, you will find the latest version of the plugin in the config/plugins (or includes/admin/plugins) folder of your theme.
Please note that we need several days to test the compatibility with our themes, and if the new plugin version doesn't include important updates, it may take more time before we update all our themes.
To update the plugin, you can simply deactivate & delete the plugin from your WordPress plugin panel, then reinstall the new version via the "Appearance" > "Install Plugins" panel.
Alternatively, you can reinstall it by uploading the new js_composer.zip file located in the config/plugins folder of your last version of the theme package.
Or, you can replace the wp-content/plugins/js_composer folder on your server via FTP with the content of the js_composer.zip file.
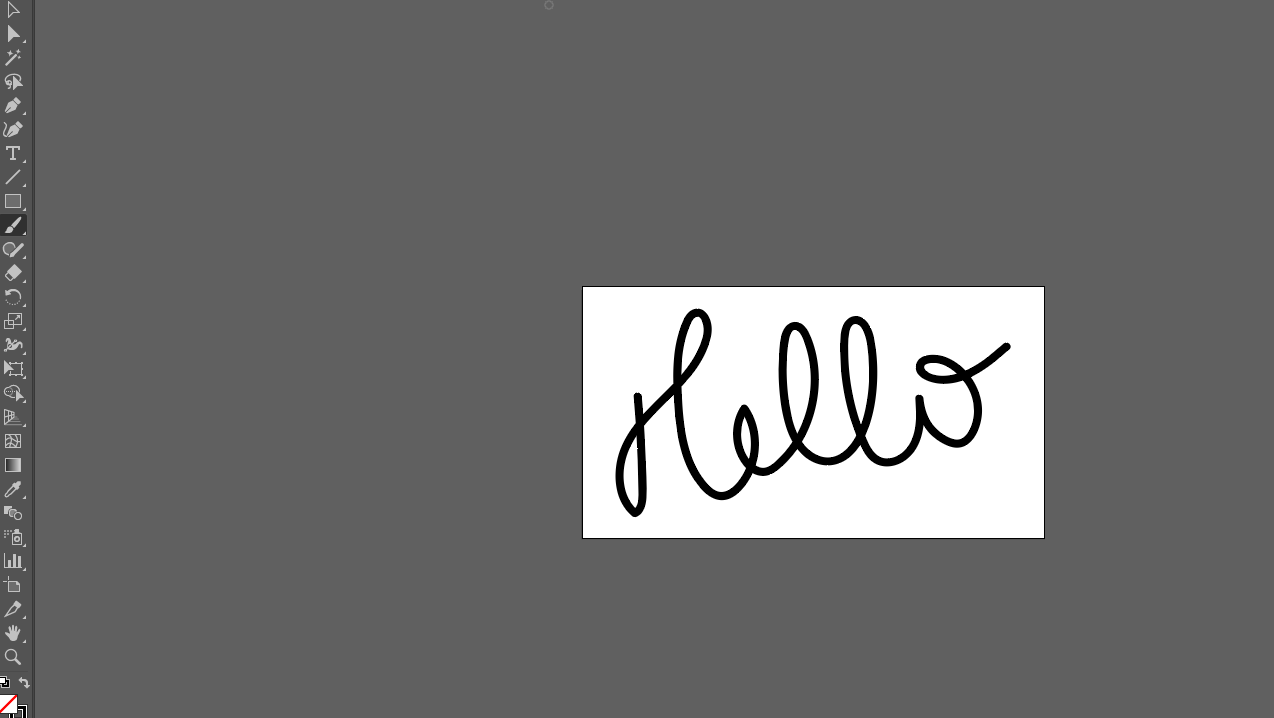
With our new Wolf Core plugin, you can create an animated SVG using the "Animated SVG" elementor widget.
In order to work correctly, your SVG illustration must be a simple path with no stroke and fill. It means once you're done, you need to remove stroke and fill from your shape.
First draw your shape, preferable a simple one using the brush tool.
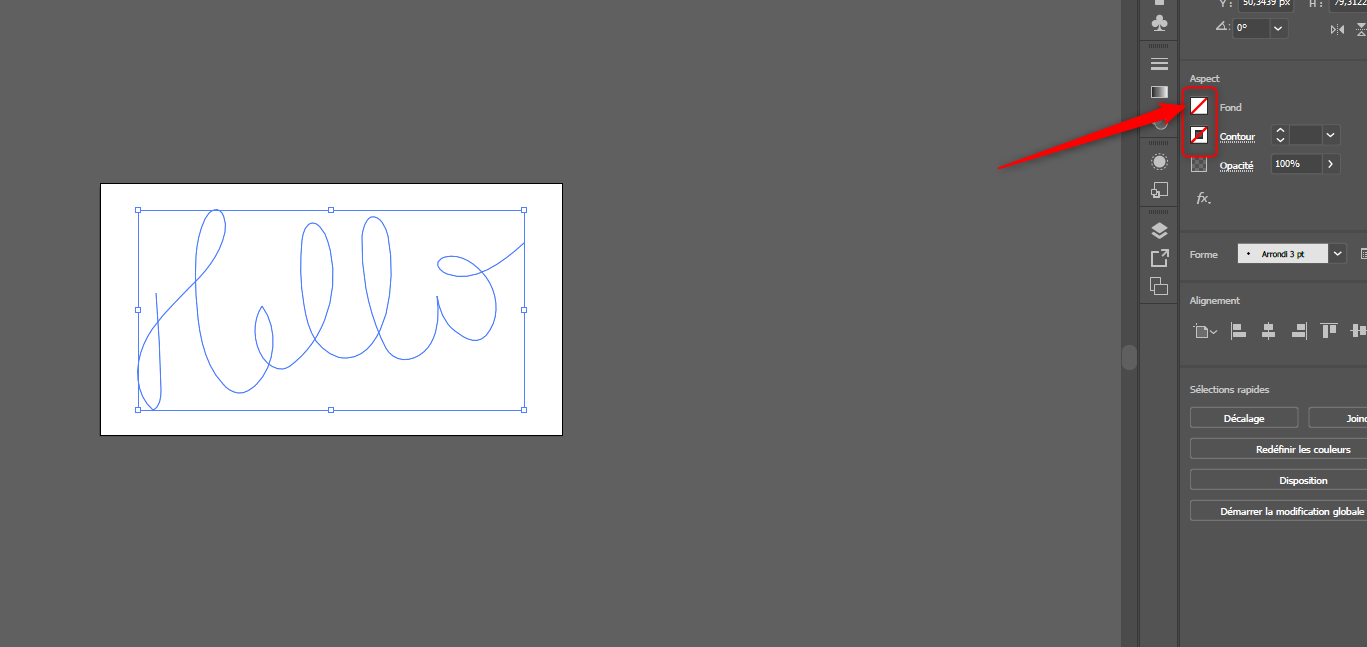
Next remove the fill and stroke so you can only have a path left.
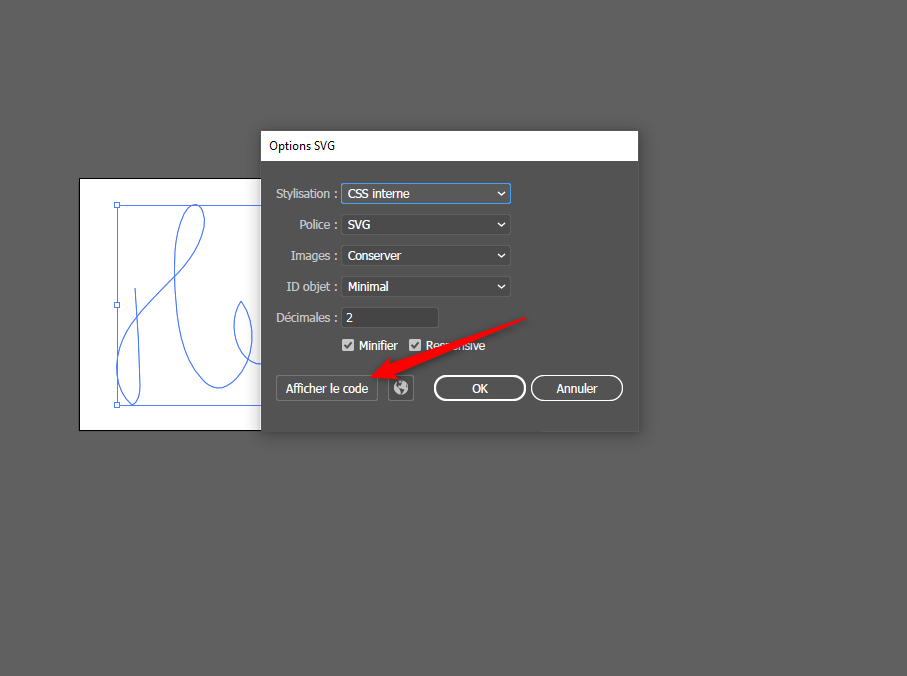
Then click on File > Export > Export as... and select any location, use the following settings and hit the "Show code" button.
Finally simply copy and paste the generated code into the animated SVG widgets settings.
9. Increasing Server Memory Limit
To increase the Server Memory Limit, you’ll need to access and modify certain files such as the php.ini file. Most hosts won’t grant you full access to modify the PHP.ini file because it affects the whole server and all the websites hosted on it. Generally you can’t modify the Server Memory Limit on low budget hosts. Please contact your host first to find out if they can adjust it for you.
10. Set your Blog Page
By default, when no page is set in the WordPress “Settings > “Reading” panel, the last posts are displayed as front page.
But you may want to specify another page for your blog.
To do so, create a page with no content and assign it as “Posts page” in the “Reading” settings.
11. Issue Importing the Demo Content
Before attempting to import the demo content, please be sure that your server fulfills the minimum Server Requirements.
Also, please follow the instructions in the Import Demo Data post.
Successfully importing demo content into WordPress can occasionally face challenges due to a range of factors beyond our control, especially with varying server configurations. While we strive to make the process as seamless as possible, we cannot guarantee 100% success for all setups. Most of the time, the main issues are limited shared hosting servers.
Please note that our themes include a 3rd party plugin to allow you to import our demo data. If you any issues importing the demo content using the "One-Click Demo Import" plugin, please check the plugin troubleshooting documentation.
If you have issues importing the demo content using the "One-Click" feature, you still can use the manual import described in the article below:
To ensure that WordPress functions properly with our themes, you must have the PHP cURL extension installed and enabled on your server.
The cURL extension is a basic server function necessary for making network requests, such as retrieving external data or communicating with other services.
If cURL is not enabled, please contact your hosting provider and request that they enable the cURL PHP extension.
A common issue that can occur with users new to installing WordPress themes is a “Broken theme and/or stylesheets missing” error message being displayed when trying to upload or activate the theme.
Be sure to do NOT install the whole downloaded package but only the theme zip file included.
You will find more information to fix this issue here.
Also, be sure that your server fulfills the Server Requirements for the theme.
The theme has been reviewed by ThemeForest and tested by us many times. There is no reason why you couldn't upload it and activate it in your WordPress installation except a server setting issue.
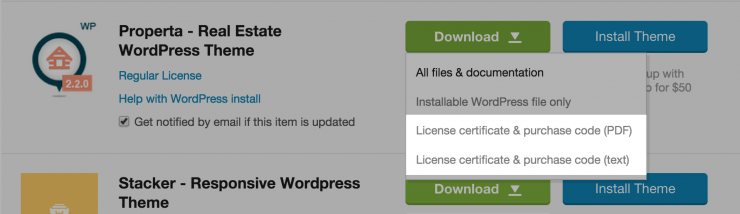
Where can I find my purchase code?
You will find the instructions to find your purchase code here.
My video background doesn’t work on mobile
The video backgrounds are disabled on mobile as most mobile devices don’t handle video backgrounds very well. Some mobile, won’t be able to play the video, others will play it disregarding the volume and play/pause settings etc… You can set an image as a fallback in the video background options. This image will be displayed as background when the video is disabled.
My Twitter feed doesn't work
This issue is related to your server configuration that doesn't allow it to fetch data from 3rd party server.
If you don’t know how to do this, you can contact your hosting service company.
If you have similar issues with the WolfGram plugin, for example, if you can’t validate your access key, you need to authorize instagram.com.
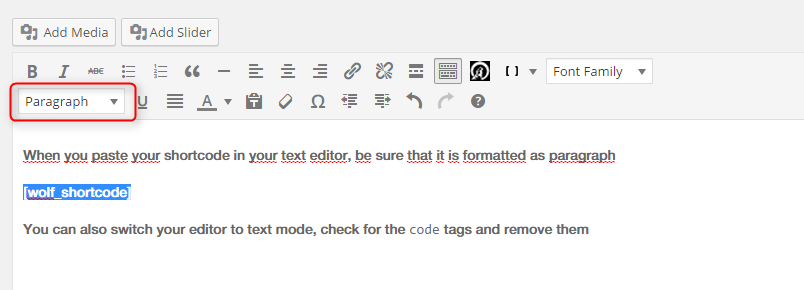
Shortcode looks broken
When you paste your shortcode in your text editor, be sure that it is formatted as a paragraph. You can also switch your editor to text mode, check for the code tags and remove them.
404 error page
Most of the time, if a custom post type single page shows a 404 error, there is a simple thing to do to fix this:
Go to your WordPress settings -> permalinks and hit the “Save” button.
If you still encounter errors with your permalink structure, it may be related to your server. Be sure that you hosting service provides the mod_rewrite PHP extension.
My fonts/icons are not displayed
If this happens to you, pls contact you hosting service company and ask them to allow loading of self-hosted fonts on your servers.
This article may also help if you can edit your .htacess file.
The Page Builder editor is gone
Be sure that the “Page Builder” option is checked in the WordPress "Screen Options" at the top right of the page.
Also, check at the bottom of the page if you don’t see below the title field. Some 3rd party plugin may have impacted the default setting and lower its priority in the page hierarchy.
14. Plugin Installation
When you install or update one of our themes, you will receive a WordPress notification message advising you to install and activate the required and recommended plugins. Follow the link provided in the notifications and install the plugins.
These issues mainly occur with OVH and GoDaddy entry offers.
When the demo is imported, your server must communicate with ours (*.wolfthemes.store, *.wolfthemes.com), where the media content is hosted, to download the images, audio, and video from the demo.
In order to activate the theme via the "About the theme" admin page, your server also needs to communicate with ours to check the validity of your purchase code.
To do so, our themes use a simple standard function (wp_safe_remote_post) to grab the info on our wolfthemes.com or wolfthemes.live server.
If, for security reason, your hoster decide to limit this function, you won't be able to use our theme or even other plugins and WordPress itself correctly.
If you encounter an issue validating your purchase code or downloading the demo content, please get in touch with your hosting service provider to fix this server-side issue.
If you need help choosing a decent hosting provider, here is a list of recommended hosters:
You don't have to activate them and they'll work for you regardless of that.
Some plugins may ask for a purchase code for registration/activation once installed, however, you can simply ignore these messages as bundled plugins do not require activation or registration.
Any time the plugin is updated, you will find the latest version of the plugin in the includes/admin/plugins or config/plugins folder of the theme. (how to update premium plugins)
First, create the page that you want to use as 404 page.
Then, simply navigate to "Appearance" > "404 Error Page" panel in your WordPress admin and set the page you just created as your "Page to be displayed as 404 page" in the plugin settings.
That's it! Simple as that. Now all error pages will display the content of this page.
18. Add Google Fonts to your Theme
You can load any Google font you like and use it for your menu, headings, text etc...
To load Google Fonts:
Go to the Google Fonts website and select the fonts you like.
Open the "Families Selected" frame at bottom right of your screen.
Copy the fonts list from the last part of the URL right after "?family="
Go to the "Appearance" > "Font Loader" panel and paste your fonts list.
19. Add Currency to Currency Switcher
If your theme supports currency switcher via our Wolf Currency Switcher plugin, you are able to add/remove currencies using this simple trick.
You must use the child theme included in your theme package and add the following function at the end of the child theme functions.php file.
Some hosting provider may prevent the acess of third party URL. It is recommended to contact your hoser if you have any issue.
20. Post Formats
All of our themes support WordPress post formats. Post Formats allow you to display your posts differently depending on your content.
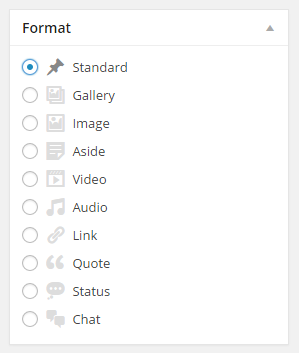
In you post editor page, you can select which post format you want to use in the “Format” box, usually, at the right of your text editor.
Please note that the way post formats are displayed may vary from theme to theme.
Standard
It is the typical WordPress post. It will display the title, the featured image (if set) and the content below.
Image
A single image. The featured image will be used as main post content.
Gallery
The theme will look for the first gallery in your post content and use it as featured gallery.
Any gallery or slider will be considered as the gallery.
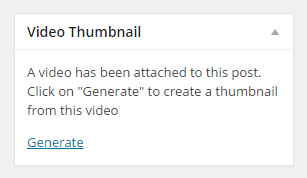
Video
The first video URL will be considered the video.
You can use our Wolf Video Thumbnail Generator plugin to generate a thumbnail from any Vimeo or YouTube video automatically and use it as featured image. The script will look for the first YouTube or Vimeo URL in your post and generate a thumbnail. You should find the “Video Thumbnail” metabox above the “Featured Image” box.
Audio
An audio file. You can use the audio shortcode provided by WordPress using the media library (“Add media” button). You can also embed a SoundCloud song using the WordPress embed feature by droping your SoundCloud URL in the post. The theme will also detect a playlist from our Wolf Playlist plugin, or WolfJPlayer plugin or any music player we can provide.
Link
A link to another site. The first URL in your post will be used and your post title will be linked to this URL.
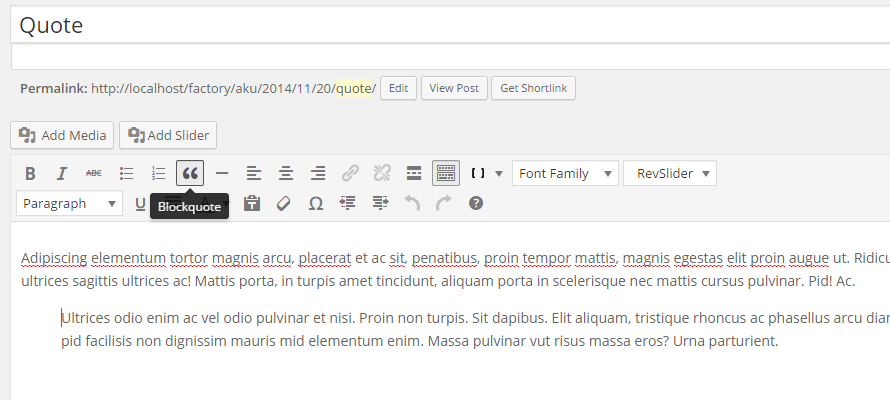
Quote
The first quote of your post will be considered as the featured quote.
Status
Typically styled without a title. Similar to a Facebook note update. You can use this post format to display an embed tweet.
Aside
Usually displayed the same as status format
Chat
A chat transcript, like so:
John: foo
Mary: bar
John: foo 2
There usually isn’t any specific style for the chat post format in most of our theme.
21. Activate Wolf Core Plugin
Once the theme and plugins are installed you have a few days to activate the Wolf Core plugin to verify your purchase.
To do so, go into the Appearance > About the Theme panel and click on the "License" tab.
Simply enter your theme purchase code to activate the plugin.
Do you want us to take care of everything for you? Learn more
22. Activate Wolf Page Builder Extension or Wolf Core plugin
Once the theme and plugins are installed you have a few days to activate the Wolf WPBakery Page Builder Extension or Wolf Core plugin to verify your purchase.
To do so, go into the Appearance > About the Theme panel and click on the "License" tab.
Simply enter your theme purchase code to activate the plugin.
Most of our themes provide a full version of Slider Revolution.
Any time the plugin is updated, you will find the latest version in the config/plugins (or includes/admin/plugins) folder of your theme.
Please note that we need several days to test the compatibility with our themes, and if the new plugin version doesn't include important updates, it may take more time before we update all our themes.
To update the plugin, you can deactivate & delete the plugin from your WordPress plugin panel, then reinstall the new version via the "Appearance" > "Install Plugins" panel.
Alternatively, you can reinstall it by uploading the new revslider.zip file located in the config/plugins folder of your last version of the theme package.
Or, you can replace the wp-content/plugins/revslider folder on your server via FTP with the content of the js_composer.zip file.
If you're experiencing issues with Elementor on your website, please follow these steps to troubleshoot and resolve common problems:
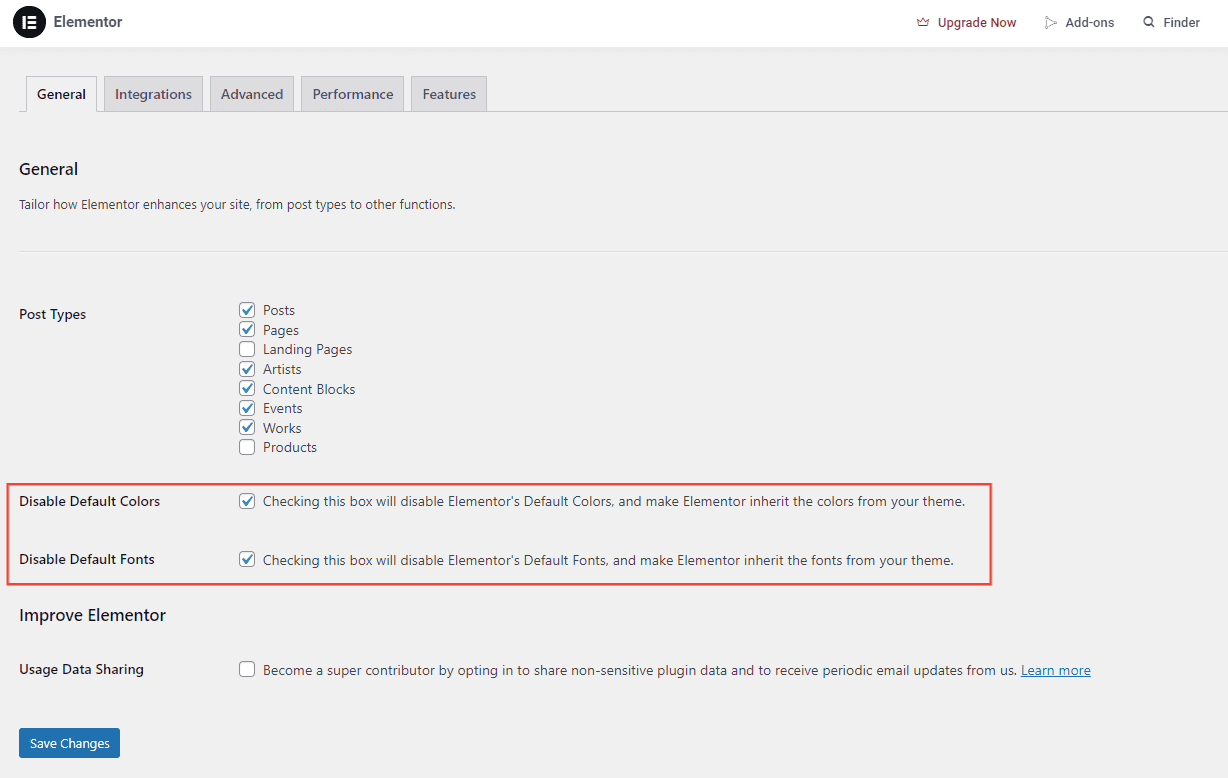
1. Disable Default Colors and Fonts
Ensure that Elementor’s default styles are not interfering with your theme by disabling the default colors and fonts. Here’s how:
Go to Elementor > Settings > General tab.
Check the boxes for Disable Default Colors and Disable Default Fonts.
This will allow your theme’s styles to load correctly without being overridden by Elementor’s defaults.
2. Check Post Types for Elementor
Elementor must be enabled for the relevant post types (e.g., pages, posts, or custom post types). To verify:
Go to Elementor > Settings > General tab.
Ensure that the necessary post types are checked to allow Elementor to work on them.
If your content isn’t appearing as expected, it may be because the post type isn’t enabled for Elementor editing.
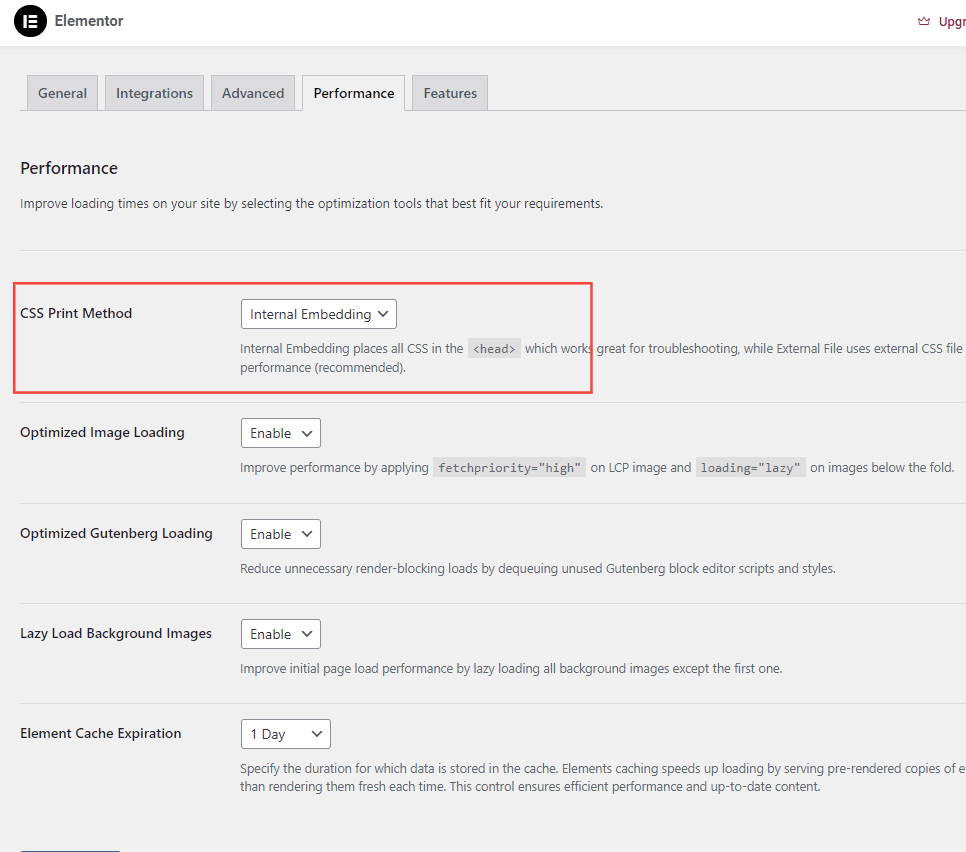
3. Set CSS Print Method to Internal Embedding
Ensure that the CSS Print Method is correctly configured for optimal performance:
Go to Elementor > Settings > Performance tab.
Set the CSS Print Method to Internal Embedding.
This setting ensures that your CSS is embedded within the page source, helping improve load times and avoiding conflicts with server configurations.
These steps should help resolve most common issues when working with Elementor. If you continue to face problems, feel free to contact our support team for further assistance.
Do you want us to take care of everything for you? Learn more
26. 404 error page
Most of the time, if a custom post type single page shows a 404 error, there is a simple thing to do to fix this:
Go to your WordPress settings -> permalinks and hit the “Save” button.
If you still encounter errors with your permalink structure, it may be related to your server. Be sure that your hosting service provides the mod_rewrite PHP extension.
27. My video background doesn’t work on mobile
The video backgrounds are disabled on mobile as most mobile devices don’t handle video background very well. Some mobile, won’t be able to play the video, others will play it disregarding the volume and play/pause settings etc… You can set an image as a fallback in the video background options. This image will be displayed as background when the video is disabled.
28. How to Increase Your Loading Speed
Website speed is a really important factor that can impact the number of visitors on your website. It has been proven many times that if your loading speed is too slow, people will leave your site even before the page has finished loading.
You can use online tools such as Pingdom to analyze your loading speed
Your images must be optimized for the web: 2000 width and 2500 pixels height max and around 500Ko
Once you're all good on this side, and your theme is installed and running, you will probably notice that it is slower than the demo. This is because, like most websites in production, we use a cache system to optimize the loading speed and make things run faster.
Here are the 3 plugins used on all our demos to increase the loading speed and make our websites run faster even for pages with a lot of content.
Autoptimize(Important: uncheck the "Also aggregate inline CSS option" and add this line) in the "Exclude scripts from Autoptimize" option)
Additionally, you can use a CDN (Content Delivery Network) to server your static assets (images, videos etc..) from another source and make our pages even faster.
All of our themes as any kind of technical products have a documentation to follow. Some of our themes have many features and tons of options for virtually various needs depending on the theme you chose. Do not expect to be able to use the most of this tools without reading the documentation. Use the documentation and you will be able to create amazing professional looking websites.
Server Requirements
Most of the issues users may experience are related to Server Requirements not respected. Issues you may encounter, such as demo content importing fails, menu partially not saving, page not rendered correctly and other oddity are related to excessively low PHP configuration limit settings of the server. Please note though that many hosts will try to keep the limits low to save their resources. You are paying for it, and you should expect to be getting your money’s worth. These values are typically lower if you choose a low budget host. Before starting, right after installing the theme, check your System Status or use the WordPress phpinfo() plugin to check your server settings. To avoid any trouble, see our list of recommended hosts.
Demo Contents
Once you install the demo content, you will have a replica of the theme demo site. To make your workflow as smooth as possible, we suggest installing the entire demo, select the pages you need, and remove the rest. Remember, that if you choose a theme containing let’s say portfolio items, you will have to install the related Portfolio plugin before importing the demo content.
Light and Dark skins
When using one of our themes, especially the ones that includes a page builder, you will see frequent references to "Light" and "Dark" skins. Skins are settings that allow you to switch your text color in accordance with the background and design you have in place. A Light skin setting refers to dark text on a bright background (usually used in bright layout). A Dark skin setting, on the other hand, features bright text on a dark background (usually used in dark layout). The skin system makes it much easier to create sections featuring contrast.
Theme Settings
Theme settings are the backbone of our themes. They give you full control over your website and allow you to customize the design without modifying a single line of code. The three major groups of options you can set in our themes are the Customizer Mods, the Page Options and the Additional Options under the "Appearance" WordPress admin menu.
Customizer Mods
The Customizer Mods are responsible for the global appearance of the entire website; unless otherwise specified in Page Options. They are accessible in the “Appearance” > “Customizer” from your admin panel, or directly by clicking on “Customize” in the frontend admin bar. They use the WordPress customizer with its awesome live preview feature.
Page Options
The Page Options are located inside every page, post, product single page. You can override particular Customizer Mods for single page diversification (like the Page Header for example).
Additional Options
Additinoal Options are complementary to the Customizer mods. They can be found under the "Appearance" WordPress admin menu. They most likely include the Google Fonts loader, maintenance page and so on…
30. Update your PHP version
PHP is the most popular server-side scripting language, powering millions of websites. If you got to this page from the notice in your theme, your server is running an outdated and unmaintained version of PHP. Not only is your website’s performance (a lot) lower than it should be, you may be running into things not working as you expect and you’re also potentially open to security vulnerabilities!
What is PHP?
PHP is a scripting language which most likely powers your WordPress website. PHP, like all software, gets updated over time to patch security issues and improve its features. And like other software, it’s important to keep your PHP version up to date.
Updating your PHP version
In most cases, you cannot update the PHP version yourself and need to contact your host about this. The upgrade process is an easy process and should be something your host can do for you without impacting your website or charging you a fee. Here’s a letter you can send to your hosting company:
Dear host,
I’m running a WordPress website on one of your servers and my WordPress theme has recommended using at least PHP 7.4. WordPress has listed PHP 7.4 as the recommended version on n their requirements page: https://wordpress.org/about/requirements/
Can you please let me know if my hosting supports PHP 7.4 or higher and how I can upgrade?
Looking forward to your reply.
My host doesn’t support PHP 7.4
If your host doesn’t support PHP 7.4 or higher, we recommend you find a host that does. WordPress have a list of WordPress hosting solutions we recommend and all support PHP 5.6 or higher. If you contact another host, be sure to ask them which PHP version your website will run on before purchasing.
If your site is having memory limit issues, you may be able to adjust this yourself – or, you may need to speak with your host. To adjust it on your own, here are some things you can try:
1. Edit your wp-config.php file.
Add this to the very bottom, right before the line that says, “Happy Blogging”:
define( 'WP_MEMORY_LIMIT', '256M' );
WordPress memory can be different from the server – you need to set this regardless of server memory settings
After a few minutes, you can download the converted file and the right and use it for the Video Scroll feature.
The video should be animated frame by frame while scrolling your page.
33. Create a default WordPress gallery (not with page builder)
Here is a short video tutorial to show how to create a gallery with WordPress.
34. "Coming Soon" or "Maintenance" Mode
To switch your website in maintenance mode you can download Wolf Maintenance plugin. It is ultra light and ultra simple to use.
Once the plugin is installed, while you’re working on your website, go in the admin “Tools” > “Maintenance” panel and choose the page where you want to redirect your visitors. For example a “Coming Soon” page.
When your website is ready to go, simply set the option to “Disabled” to put your whole website back online.
35. Translate your Theme
In each of our themes and plugins, you will find a “languages” folder including a themename.pot or a pluginname.pot file.
A .pot file is a template containing all translatable strings that you can use to translate your theme or your plugin in any language and generate the .po and .mo files that will be used by WordPress to display the translation.
To use this template file, you can use Loco Translate plugin. This plugin allows you to translate all strings directly into your admin panel.
You can also use Poedit software to translate the theme from the .pot file, but you will have to upload the files manually to your server every time you update your translation.
First of all, you must set your language in the WordPress settings.
Set your Language in your WordPress Installation
To set a language for your site, navigate to “Settings” > “General” and select your language at the bottom of the page.
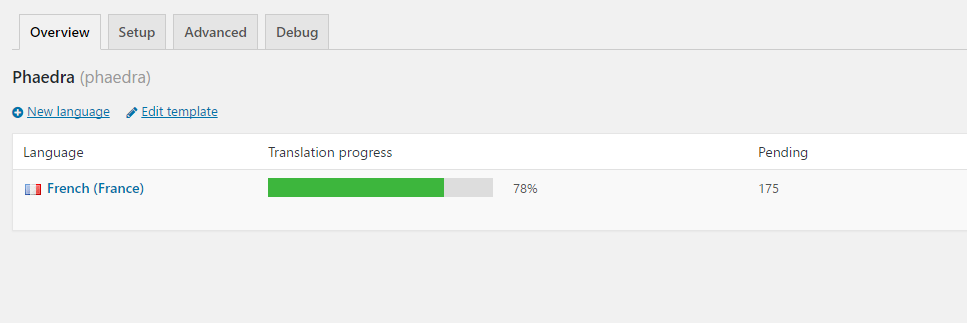
Translate your Theme with Loco Translate
Install and activate Loco Translate in your WordPress installation.
Navigate to “Loco Translate” > “Themes” (or “Plugins”) and select the theme (or plugin) you want to translate.
In the “Overview” tab, click on “New language” or select an existing language if the translation isn’t completed.
Simply select the expressions one by one and fill the “Translation” field for each. Don’t forget to save your file after modifications.
Please help us adding new translations or improving an existing translation by sending us your po and mo files to [email protected]. It will be much appreciated!
Translate your Theme with Poedit
To create your translation files, open Poedit, go to “File” > “New from POT file”, and select the .pot file provided in your plugin or theme folder.
You will be able to translate each string in your own language.
For a theme, the translation files must be named fr_FR.po and fr_FR.mo for a french translation or de_DE.po and de_DE.mo for a german translation.
Replace the language code by your own. You can browse the WordPress language code list to find the appropriate code for your language.
For a plugin, the translation files must be named wolf-plugin-slug-fr_FR.po and wolf-plugin-slug-fr_FR.mo. Replace the plugin slug and the language code to suit your needs.
More tools
To translate your theme you can also use WPML plugin (premium) if you need a multi-language website.
36. Create a SVG Logo
Our recent themes (released from June 2017) support SVG logo.
Scalable Vector Graphics is a XML-based vector image format for two-dimensional graphics that supports interactivity and animation.This option gives you a modern, retina ready logo solution and allows the theme to change the logo color automatically depending on context. This tutorial will familiarize you with the SVG file format.
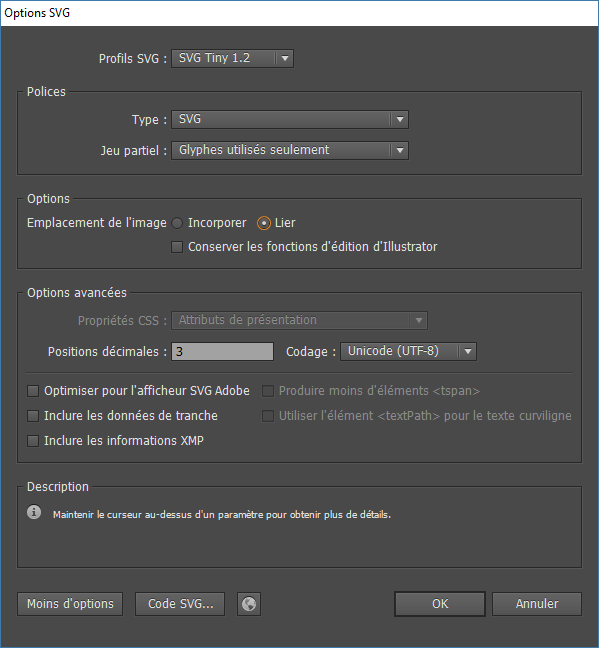
To export create an SVG log here is how to proceed in Adobe Illustrator.
1. Create your logo with your desired font using the text tool, with your chosen proportion, and padding.
2. Once, you’re done, you will need to vectorize it. Select your text with the selection tool
3. Finally, export your SVG with “File” > “Save as..” and choose the SVG format using the following settings:
37. About our themes
Each of our themes is carefully coded respecting the WordPress coding standards. All themes have been reviewed by the ThemeForest review team to guarantee the highest quality.
Our most recent themes share the same code structure and core features to maintain consistency among the theme collection and allow switching from theme to theme easily. What makes each theme unique is the specific features and design it offers depending on the field it targets.
For example, a theme dedicated to musicians will offer a discography feature and a theme for designer will come with a portfolio feature. In addition to the knowledge base, each theme comes with a theme documentation that covers theme specific features.
If you’re stuck with anything, be sure to search this knowledge base and the theme documentation before reaching us for further help. Most issues you may encounter or question you may ask are covered in the articles. But you can’t find a solution here, feel free to post a ticket.
38. Enable WP_DEBUG
WP_DEBUG is a PHP constant (a permanent global variable) that can be used to trigger the "debug" mode throughout WordPress and display error messages.
To enable the debug mode, open the wp-config.php file at the root if your WordPress installation and set the WP_DEBUG value to true.
define('WP_DEBUG', true);
You should find this line at the end of the wp-config.php file above the line that says
/* That's all, stop editing! Happy blogging. */
39. Increasing the PHP Max Input Vars
The PHP Max Input Vars is the maximum number of variables your server can use for a single function. To work properly with a modern WordPress theme set this value to 3000. Lower values can create problems such lost data in your Theme Options, Widgets disappear etc. A common issue that may occur with a low max input vars in menu items not saving.
How to increase the PHP Max Input Vars
Like the other values above, you’ll need to access and modify either the php.ini or the .htaccess files. Most hosts won’t grant you full access to modify the PHP.ini file because it affects the whole server and all the websites hosted on it. Please contact your host first to find out if they can adjust it for you.
For advanced users who have their own server setups and full access to the php.ini file, please go ahead and try Method 1 first before the other method. For standard users, we encourage you to try Method 2 instead.
1 Method: edit the PHP.ini file
NOTE: many shared hosts prohibit you from having direct access to the PHP.ini file. Only do this method if you have direct access to your PHP.ini file or if you’re on your local host.
Locate your PHP.ini file. If you can’t find it, then you can create your own PHP.ini file in the root folder of your WordPress installation.
If you find your existing PHP.ini, open the file and locate the following line of code (xx represents a number): max_input_vars = xx; And set it to your desired limit. For example, 3000.
If you created your own PHP.ini file, then add the same code inside it: max_input_vars = 3000; Simply change the value to the recommended value. For example, 3000.
Save your changes, and reboot your local host or your server.
2 Method: edit the .HTACCESS file
NOTE: make sure to back up your .htaccess file before editing.
Locate your .htaccess file which is usually in the root folder of your WordPress installation. If you can’t find it, it may be because it’s hidden. Here’s a tutorial for Windows and a tutorial for Mac on how to reveal hidden files on your computer.
Open the .htaccess file with a text editor program (Notepad or TextEdit) and add the following line of code: php_value max_input_vars 3000
or the following if you have the suhosin security patch:
php_value suhosin.request.max_vars 3000
php_value suhosin.post.max_vars 3000
Simply change the value to the recommended value. For example, 3000.
Save the file and refresh your website.
40. Read more tag
You can split your post to add a “Continue reading” link on the post index page.
You can find the “More Tag” button in the first row of the editor.
You can further customize the message that displays in the link to the full post content. You will need to do this in the text view of your editor. Once you have changed to the text editor mode, look for this code:
<!--more-->
To customize the message, simply add a space after
<!--more
and turn it into something like this:
<!--more But wait, there is more-->
41. Import Demo Data
One-Click Demo Import
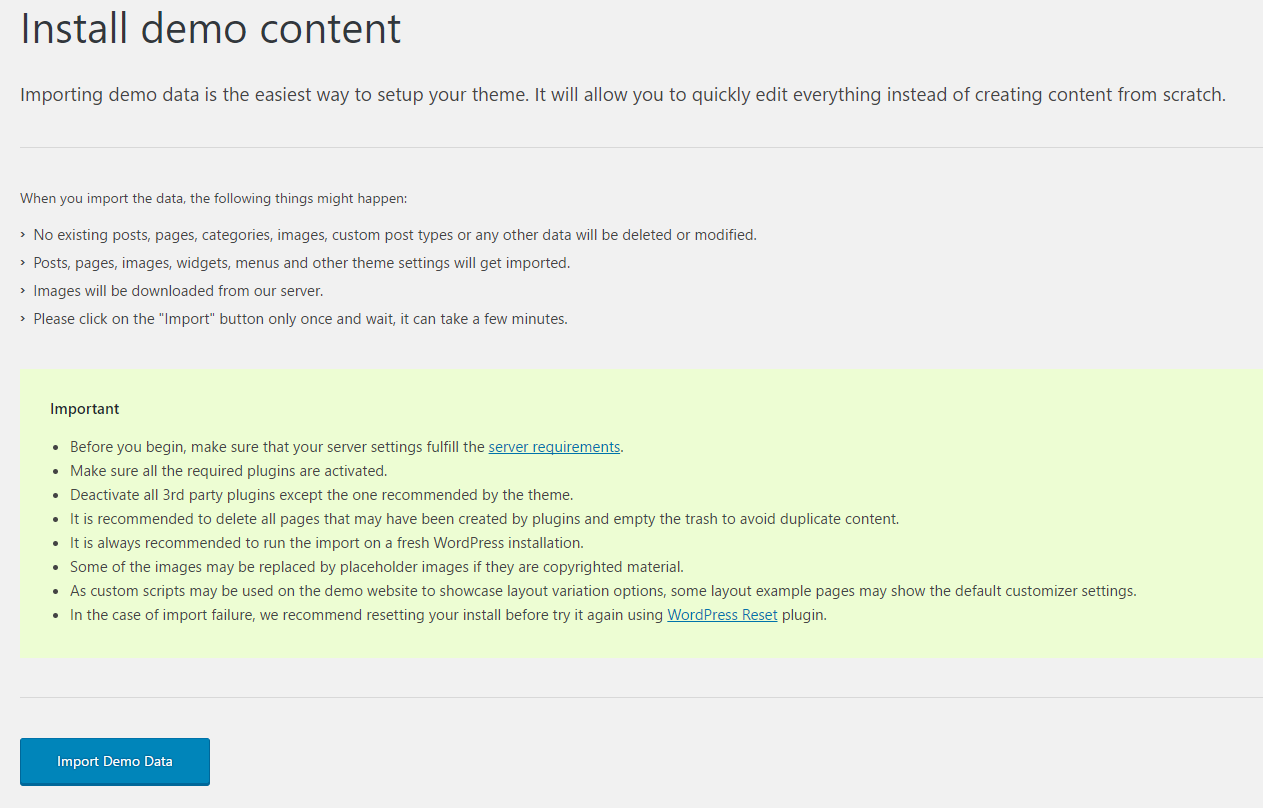
Importing the demo data is the easiest way to set up your theme. It will allow you to quickly edit everything instead of creating content from scratch. In most of our themes, you can install the whole demo content through the “Import Demo Data” panel.
Make sure that you have entered your theme purchase code to authorize Wolf WPBakery Page Builder Extension.
The Site Language must be set to "English (United States)" in the "Settings" > "General" panel. You will be able to change it afterwards
Deactivate all 3rd party plugins except the one recommended by the theme.
You must install all the required plugins after theme activation. You may be invited to install default plugin pages. You must decline all plugin page installations to avoid duplicate pages.
Once all your plugins are installed, go to the “Appearance” > “Import Demo Data” panel, select a demo click the “Import” button and wait, it can take a while.
Import Demo Content Manually
If you want to import the demo data manually, or if you have trouble using the 1-click importer please refer to this article:
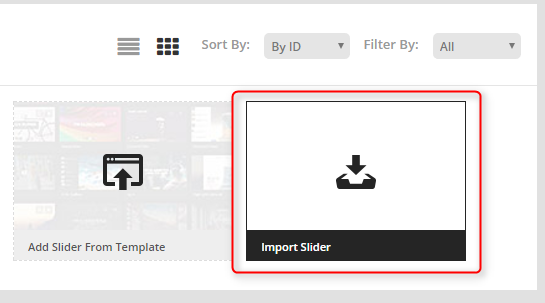
You will find the demo sliders in the revslider folder.
To import a slider, navigate to your admin Slider Revolution panel, click on the "Import Slider" icon and select your chosen slider zip file from the "revslider" folder.
To import custom fonts to your theme, use the child theme included in your theme package.
Your fonts must be in web format, meaning you must have one or several font files for each font (ttf, wotf format, etc.) and a CSS snippet to include.
To be able to use your new font in the customizer and page builder element settings, you need to add a custom function in your child theme functions.php
Here is an example with the Roboto font. We will use the Font Squirrel web generator tool to generate a font package.
1. Import the font files in your child theme. We recommend copying the files into a assets/fonts folder of your theme.
2. Paste the CSS import snippet into your child theme style.css file
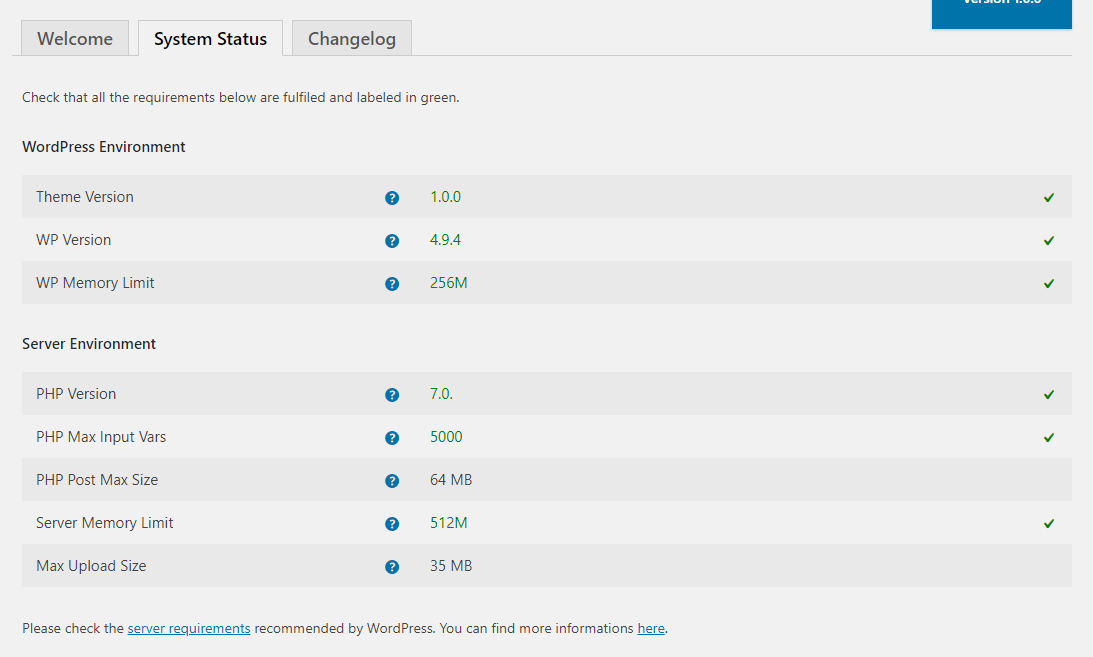
Our most recent themes come with a system status table directly into your WordPress Dashboard (in the admin “Appearance” -> “About the Theme” panel).
To be able to acess the system status table, you need to be able to install and activate plugins (more info about WordPress capabilities here).
If you have red errors indicating problems are present, it is likely you are not in compliance with the Server Requirements for a modern WordPress installation. Please consider that most of our themes, as any other Premium themes, come packed with a Page Builder and full options set that need decent server performances to run smoothly. Any red error has a link that points to a tutorial showing how to fix the value to meet the requirements.
You can always contact your host to have them adjusted as needed. Please note though that many hosts will try to keep the limits low to save their resources. You are paying for it however, and you should expect to be getting your money’s worth. These values are typically lower if you choose a low budget host.
The most important values you need to be compliant are:
WP Memory Limit: the WP Memory Limit is the maximum amount of memory (RAM) that your site can use at one time. When you reach your Memory Limit, you’ll encounter a fatal error. (read more)
Max Input Vars: the PHP Max Input Vars is the maximum number of variables your server can use. Lower values can create issues such lost data in your Theme Options, Widgets disappear etc. (read more)
System Status Check with WordPress phpinfo() Plugin
If the theme you chose doesn’t include this feature, no worries, you can use the WordPress phpinfo() plugin.
Once installed, go to the plugin phpinfo() page (admin “Settings” -> phpinfo() ).
The first column refers to your installation value, and the second column refers to the limits of your host. The latter values are often lower if you have selected a cheaper hosting package.
You can always contact your host to ask what the current settings are, and have them adjusted if necessary. Some hosts will try to keep PHP limits low to conserve resources. Since are paying for those resources, you should rightfully expect to be getting your money’s worth.
45. Wolf WPBakery Page Builder Extension Plugin
Wolf WPBakery Page Builder Extension Plugin is a plugin that extends WPBakery Page Builder features.
It adds many page builder elements and features to your theme and is only available to users who have purchased one of our themes.
It comes packed with your theme and is downloaded and installed on theme activation. You just need to enter your theme purchase code in your admin and you're all set.
46. Theme Documentations
Below is a list of documentation for each available theme.
Most of the time, the problem with WordPress and security isn’t going to be themes or plugins, it’s actually how you configure your WordPress installation.
Here are some basic things your need to do to keep your WordPress environment safe:
Please, note that this post is not a complete WordPress security guide but only a few tips to help you to get started.
48. Increasing the Upload Size Limit
Upload an audio file or a video file can a be a problem if your server has a low upload maximum size limit. (e.g 4M).
Here is a way to work around this.
Use the following tip if you need to increase the upload_max_filesize on your web server, especially if you are not able to directly access/edit the php.ini file.
1. Create a new file and name it php.ini (the name and the extension are very important).
2. Open it with any text editor and paste the following lines:
upload_max_filesize = 40M
post_max_size = 40M
3/ Then, save the file and upload it into your wp-admin folder.
Tested on 1&1 and Bluehost.
If it doesn’t work, contact your hosting provider.
Additionally, you can check this post to find more ways to increase your max upload size.
49. Add Typekit Fonts to your Theme
You can add any Typekit Font to your theme, directly in theme options and select it in the customizer “Fonts” tab or in the page builder, where a “font” option is available. But you may want to add Typekit Fontsas well.
1. First, install and activate the Typekit Fonts for WordPress plugin and follow the instructions in this video to enqueue your Typekit fonts in your website:
2. Go to Appearance > Theme Options > Fonts tab (or Appearance > Fonts Loader) and add your fonts separated by a “|” (i.e “Adobe Caslon Pro|Acumin Pro”).
Now, you will be able to select your Typekit fonts anywhere in the theme where a “fonts” option is available.
Note: this customization is not possible with older themes released before “Bite”.
50. Compatible 3rd Party Plugins
Most of the time, issue with the theme/plugins package are due to low server settings or 3rd party plugins.
We can't guarantee the quality and compatibility with all WordPress plugins as you can imagine, that's why we can't provide support for 3rd party plugin or services.
However, most common and well-coded WordPress plugins should work fine with your theme/plugins packages.
Here is a non-exhaustive list of plugins that we use on the demo installations or have been tested that are not already included in your theme package and works perfectly with our theme and plugins.
Yoast SEO
WP Super Cache
W3 Total Cache
Loco Translate
Autoptimize
UpdraftPlus - Backup/Restore
Antispam Bee
404page - your smart custom 404 error page
Better Search Replace
Contact Form 7 Honeypot
Duplicate Post
EWWW Image Optimizer
Force Regenerate Thumbnails
Timetable and Event Schedule by MotoPress
My Sites Search
oEmbed Gist
PixProof
Post Types Order
Reorder My Sites
Seamless Sticky Custom Post Types
Widgets in Menu for WordPress
WordPress Reset
WordPress Importer v2
WP User Avatars
WP CDN Rewrite
WPML
51. Child Theme
All our theme packages include a child theme. A WordPress child theme allows you to apply custom code changes to your site. Using a child theme ensures your customizations will not be overwritten, even if you update the parent theme.
For most cases, you won’t need a child theme if you just want to add a couple of lines of CSS for a style adjustment. You can add custom CSS styles directly in the Customizer “Additional CSS” tab (since WordPress 4.7.2). But if you need more advanced customizations, like more CSS rules to overwrite the styles of the theme or even add your own PHP functions, it is strongly recommended to use a child theme.
How to set up your own Child Theme
Although child themes can be a great way to add custom changes to your theme, they are most often used to customize core code taken from the parent theme. Because of this, please be aware that customizations of this nature fall outside our scope of support, and we will be unable to assist you with any issues that may arise. To use the child theme, find the “themename-child” folder in your theme package and upload it to your wp-content/themes folder through FTP. As it is mainly made to be edited, we didn’t include it as a zip file, so you will have to install it manually. Once installed and activated, it will automatically inherit all parent theme features, functions, and styles.
A working version of WordPress must be installed on your server/domain before you can install one of our themes. If you need help installing WordPress, follow the WordPress Codex, or watch the Woo Themes Instructional Video.
Before using any theme, it is important to understand how native WordPress functions work, and how to establish ownership of your new site.
WordPress links you will find useful:
WordPress Codex: General information about WordPress and how to install it on your server.
We have added many new homepages, inner pages and post type layouts to the demo content.
The Wolf Slider plugin will be deprecated in favor of the page builder slider elements and the content block system. It will still be available within the theme for a while.
What You Need to Know Before Updating
Off course, updating is not mandatory but it is recommended.
The new version will come with an updater to update your content for this new version automatically. However, here are few recommendations to follow before updating.
Make sure that your WordPress installation is up-to-date
Once it is done, you may need to run the Force Regenerate Thumbnails plugin to resize all your images to suit the new design.
54. Import Demo Content Manually
If you want to import the demo data manually, or if your theme doesn’t offer the “one-click import” feature (yet), you can import the demo content the old fashion way using the WordPress Importer tool.
In your theme package, you will find a link to download the demo data files. Follow this link, upload the zip folder, and extract it using an archiver (WinRAR, WinZip etc..). You will find 3 files and a folder in the extracted archive.
content.xml – The file containing all pages, medias etc…
customizer.dat – The customizer settings.
widgets.wie – The widget settings.
Import the content
In your admin panel, go to “Tools” -> “Import”.
Choose the WordPress option (last one)
Select the content.xml file
Hit the “upload file and import” button and follow the instructions
Note that some of our demo data files are huge and you may encounter issues if your server settings are too low, especially max_execution_time, post_max_size, and upload_max_filesize settings (read more).
After testing several alternatives to the default WordPress importer, we found that the WordPress-Importer v2 plugin works fine even for hosts with low server settings. To use this plugin instead of the default importer plugin, deactivate "WordPress Importer" and install and activate this one instead.
Note that during the content import using WordPress Importer v2, even if the progress bar doesn't move, please wait until it says the posts have been imported.
WordPress Importer v2 and Elementor
It seems that WP Importer v2 sometimes imports content from Elementor incorrectly. The solution is
First, use WordPress Importer to import the content without importing the media (don't check the import media option)
Then use WP importer 2 to import the media. You can use the same content.xml file (it shouldn't re-import existing content, or use the medias.xml file that you will find in the demo content package)
Import the customizer settings
All customizer mods are automatically set on theme activation, just like the demo. But if you need to reset them for some reason, or if your theme includes different demos with different customizer mod sets, you may want to import them. To do so, install the Customizer Export/Import plugin.
In your admin panel, go to “Appearance” -> “Customize” or click on the “Customize” link in your front-end admin bar
Navigate to the “Export/Import” tab
Click the “browse” button and select the customizer.dat file
You should be invited to install and activate this plugin on theme activation (at least on all our recent themes), so it is recommended to install it if you want to update the theme automatically.
Once the plugin is installed, simply go to the Envato market panel and follow the instruction to set up your Envato account.
You will get notified in your admin dashboard every time a new version of the theme is available. Then, simply follow the link in the notification message and update the theme in a single click in the Envato market plugin page.
It is essential to keep your WordPress installation up to date at least for security reasons. WordPress currently powers 23% of all websites in the world. Due to its immense popularity, WordPress is a popular target for hackers, malicious code distributors, data thieves, and wannabe hackers. Every time a new version of WordPress is released, it comes with security fixes and improvements and updating your WordPress installation will improve the safety of your website.
New Features
Our themes evolve along with WordPress. We enforce to implement the latest WordPress features in each theme release or update, following the WordPress philosophy. For example, when WordPress implemented the Customizer, we decided to follow this trend and move all major styling options in it.
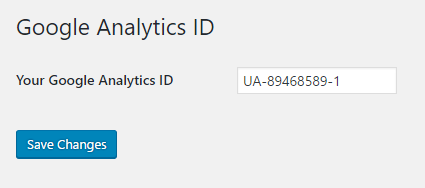
It is an ultra-light weight and very simple plugin to output a GA code very easily.
Once the plugin installed and activated, paste your Google Analytics ID in the “Tools” > “Analytics” panel.
Your tracking code will automatically be displayed (for non-logged in user only).
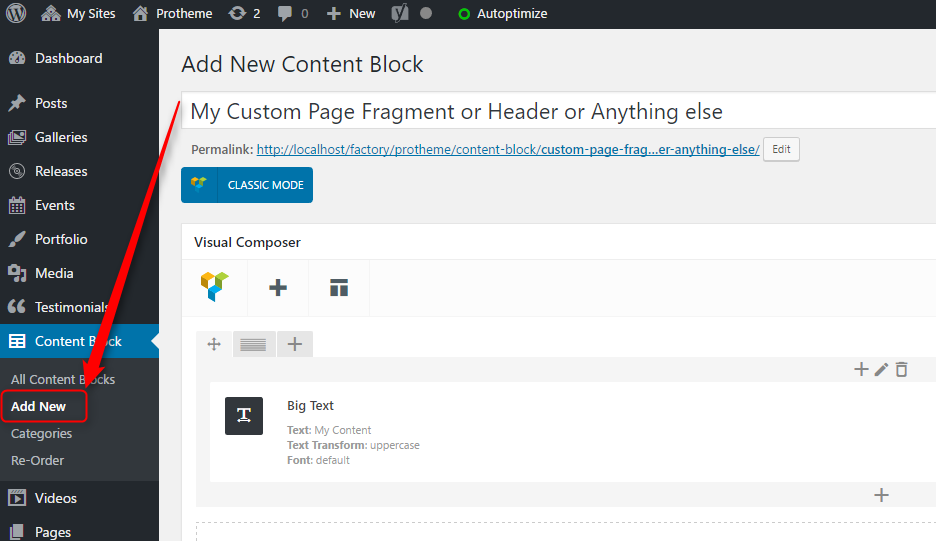
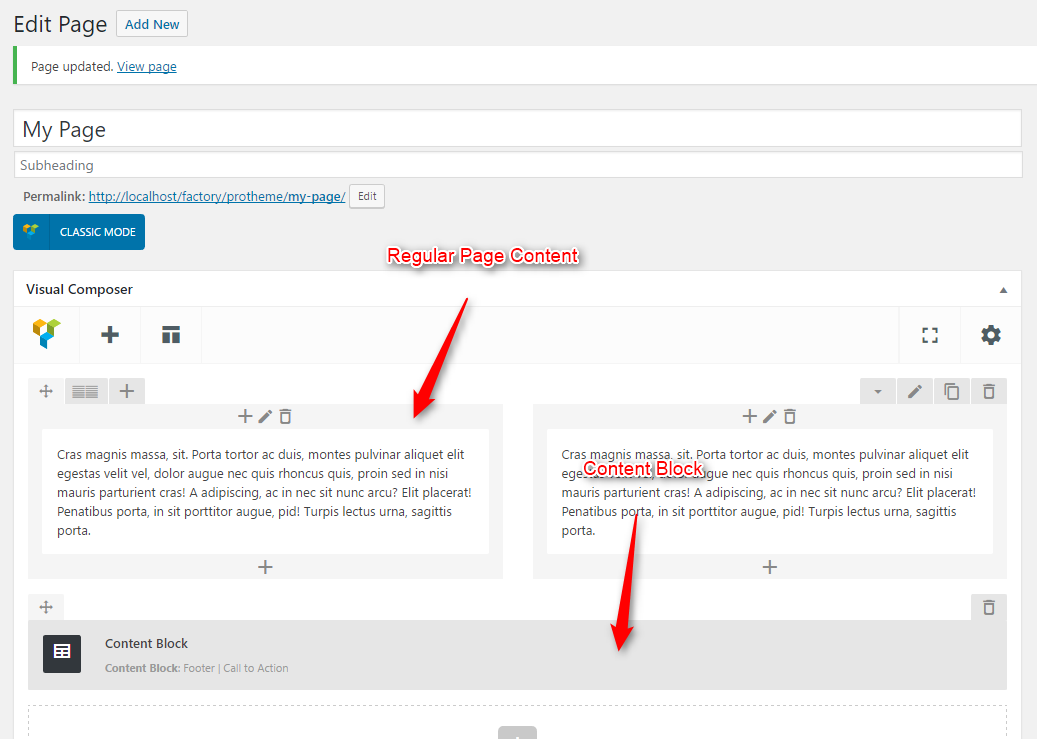
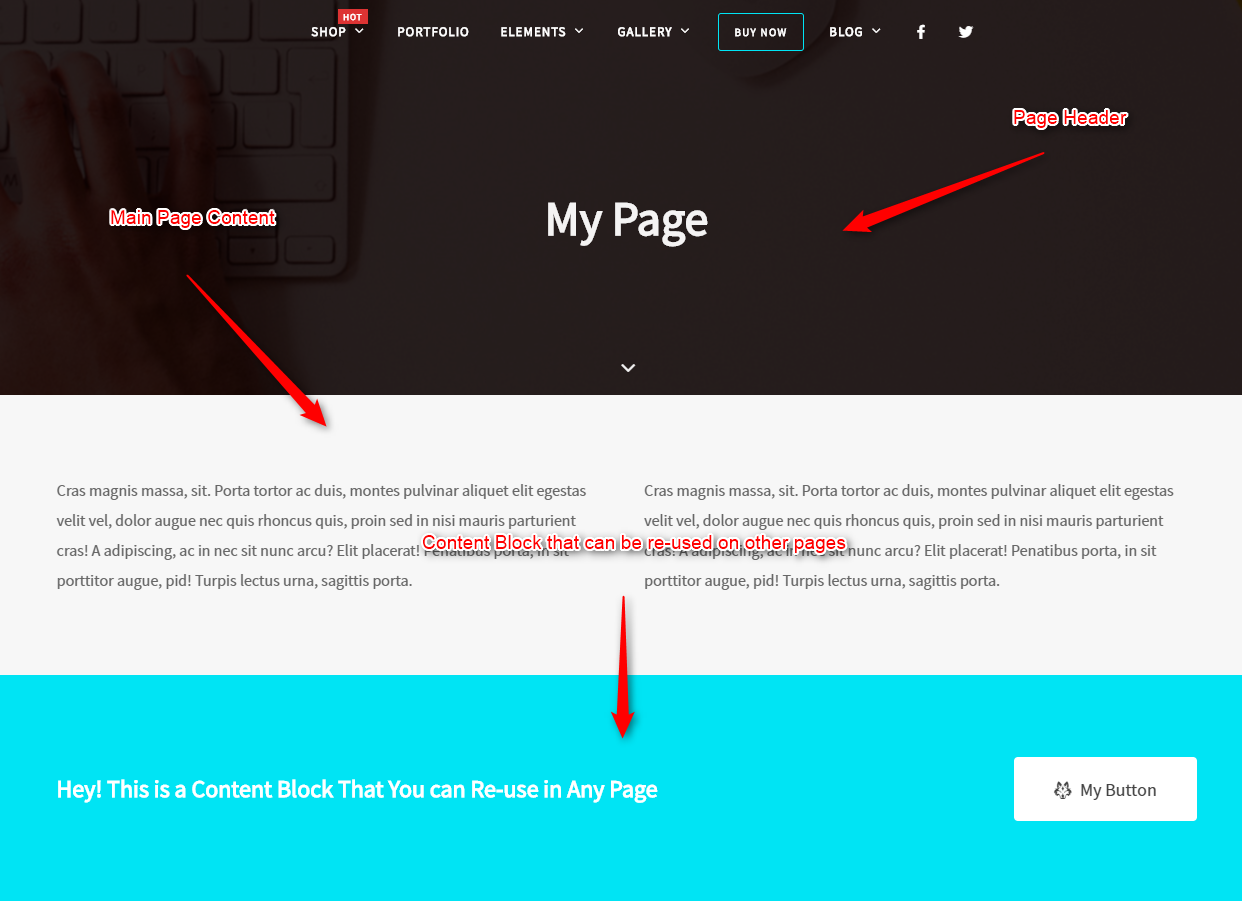
59. Content Blocks
Our themes offer the Content blocks feature.
The Content blocks feature is an amazing system to create content that you can use as page fragments, or custom header and footer.
Simply create a content block (Content Block > Add New) using WPBakery Page Builder just like a regular page and use it anywhere you want in different pages.
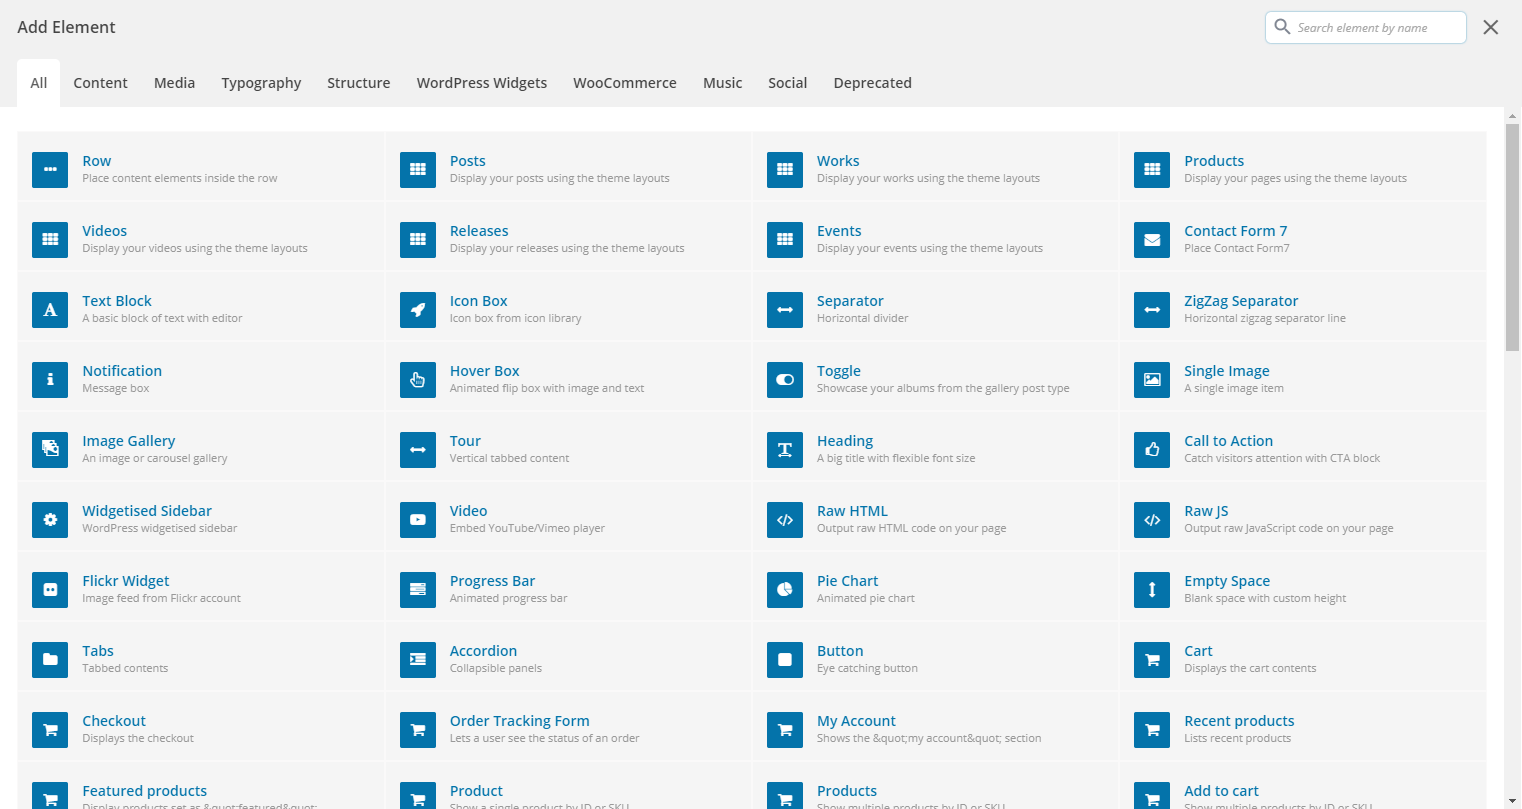
To add a Content Block in your page, find the "Content Block" element , in the WPBakery Page Builder elements window and insert it in your page.
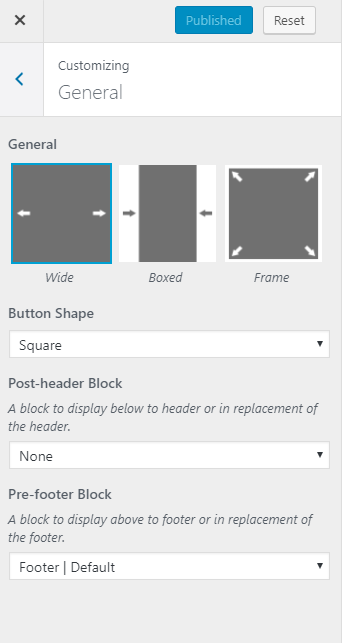
Post-Header & Pre-Footer
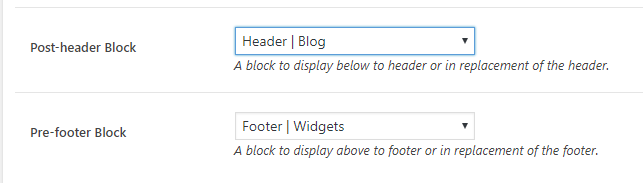
You can set content blocks as post-header and/or pre-footer area. It will display your choosen Content Block, just below the header, and/or just before the footer.
You can set you header and footer blocks to be displayed on all pages via the "Customizer" > "General tab".
Or you can set your custom header and footer blocks only on certain pages using the page options below your text editor.
Note that the content block option includes an inheritance system. For example, if you set a particular header block on your blog page (the page set as page for posts in the WordPress reading settings), all blog pages will inherit this setting.
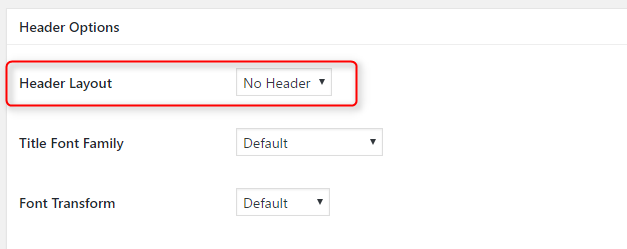
Replace Default Header & Footer
You can use this feature to replace the default header or footer, by hiding the footer or header using the page options. This way you can, for example, create a custom footer for several pages and use the in-built footer on every other pages.
60. Transform your playlist into a streaming player
If you have one of our recent music themes that comes with the Wolf Playlist plugin, it is possible to transform one of your playlist into a radio/streaming player.
To achive this, you will need to use the child theme included in your theme package, so you will be able to update the parent theme in the future if needed without loosing the modifications.
1. First, simply create a playlist, insert any mp3 file, name it by the title you want, and note the playlist ID.
2. Open your child theme functions.php file, copy and paste the code linked below, and replace the first two lines by your own playlist ID and streaming URL.