Most of our themes provide a full version of WPBakery Page Builder.
Any time the plugin is updated, you will find the latest version of the plugin in the config/plugins (or includes/admin/plugins) folder of your theme.
Please note that we need several days to test the compatibility with our themes, and if the new plugin version doesn't include important updates, it may take more time before we update all our themes.
To update the plugin, you can simply deactivate & delete the plugin from your WordPress plugin panel, then reinstall the new version via the "Appearance" > "Install Plugins" panel.
Alternatively, you can reinstall it by uploading the new js_composer.zip file located in the config/plugins folder of your last version of the theme package.
Or, you can replace the wp-content/plugins/js_composer folder on your server via FTP with the content of the js_composer.zip file.
You should be invited to install and activate this plugin on theme activation (at least on all our recent themes), so it is recommended to install it if you want to update the theme automatically.
Once the plugin is installed, simply go to the Envato market panel and follow the instruction to set up your Envato account.
You will get notified in your admin dashboard every time a new version of the theme is available. Then, simply follow the link in the notification message and update the theme in a single click in the Envato market plugin page.
3. Create a default WordPress gallery (not with page builder)
Here is a short video tutorial to show how to create a gallery with WordPress.
4. Translate your Theme
In each of our themes and plugins, you will find a “languages” folder including a themename.pot or a pluginname.pot file.
A .pot file is a template containing all translatable strings that you can use to translate your theme or your plugin in any language and generate the .po and .mo files that will be used by WordPress to display the translation.
To use this template file, you can use Loco Translate plugin. This plugin allows you to translate all strings directly into your admin panel.
You can also use Poedit software to translate the theme from the .pot file, but you will have to upload the files manually to your server every time you update your translation.
First of all, you must set your language in the WordPress settings.
Set your Language in your WordPress Installation
To set a language for your site, navigate to “Settings” > “General” and select your language at the bottom of the page.
Translate your Theme with Loco Translate
Install and activate Loco Translate in your WordPress installation.
Navigate to “Loco Translate” > “Themes” (or “Plugins”) and select the theme (or plugin) you want to translate.
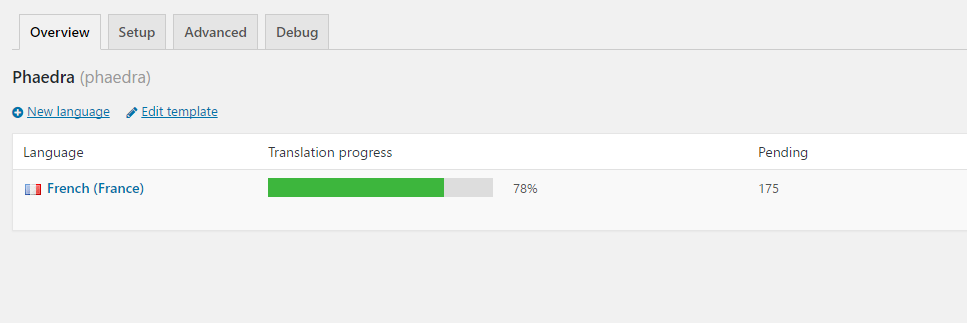
In the “Overview” tab, click on “New language” or select an existing language if the translation isn’t completed.
Simply select the expressions one by one and fill the “Translation” field for each. Don’t forget to save your file after modifications.
Please help us adding new translations or improving an existing translation by sending us your po and mo files to [email protected]. It will be much appreciated!
Translate your Theme with Poedit
To create your translation files, open Poedit, go to “File” > “New from POT file”, and select the .pot file provided in your plugin or theme folder.
You will be able to translate each string in your own language.
For a theme, the translation files must be named fr_FR.po and fr_FR.mo for a french translation or de_DE.po and de_DE.mo for a german translation.
Replace the language code by your own. You can browse the WordPress language code list to find the appropriate code for your language.
For a plugin, the translation files must be named wolf-plugin-slug-fr_FR.po and wolf-plugin-slug-fr_FR.mo. Replace the plugin slug and the language code to suit your needs.
More tools
To translate your theme you can also use WPML plugin (premium) if you need a multi-language website.
5. Add Google Fonts to your Theme
You can load any Google font you like and use it for your menu, headings, text etc...
To load Google Fonts:
Go to the Google Fonts website and select the fonts you like.
Open the "Families Selected" frame at bottom right of your screen.
Copy the fonts list from the last part of the URL right after "?family="
Go to the "Appearance" > "Font Loader" panel and paste your fonts list.
6. Add Typekit Fonts to your Theme
You can add any Typekit Font to your theme, directly in theme options and select it in the customizer “Fonts” tab or in the page builder, where a “font” option is available. But you may want to add Typekit Fontsas well.
1. First, install and activate the Typekit Fonts for WordPress plugin and follow the instructions in this video to enqueue your Typekit fonts in your website:
2. Go to Appearance > Theme Options > Fonts tab (or Appearance > Fonts Loader) and add your fonts separated by a “|” (i.e “Adobe Caslon Pro|Acumin Pro”).
Now, you will be able to select your Typekit fonts anywhere in the theme where a “fonts” option is available.
Note: this customization is not possible with older themes released before “Bite”.
7. Create a SVG Logo
Our recent themes (released from June 2017) support SVG logo.
Scalable Vector Graphics is a XML-based vector image format for two-dimensional graphics that supports interactivity and animation.This option gives you a modern, retina ready logo solution and allows the theme to change the logo color automatically depending on context. This tutorial will familiarize you with the SVG file format.
To export create an SVG log here is how to proceed in Adobe Illustrator.
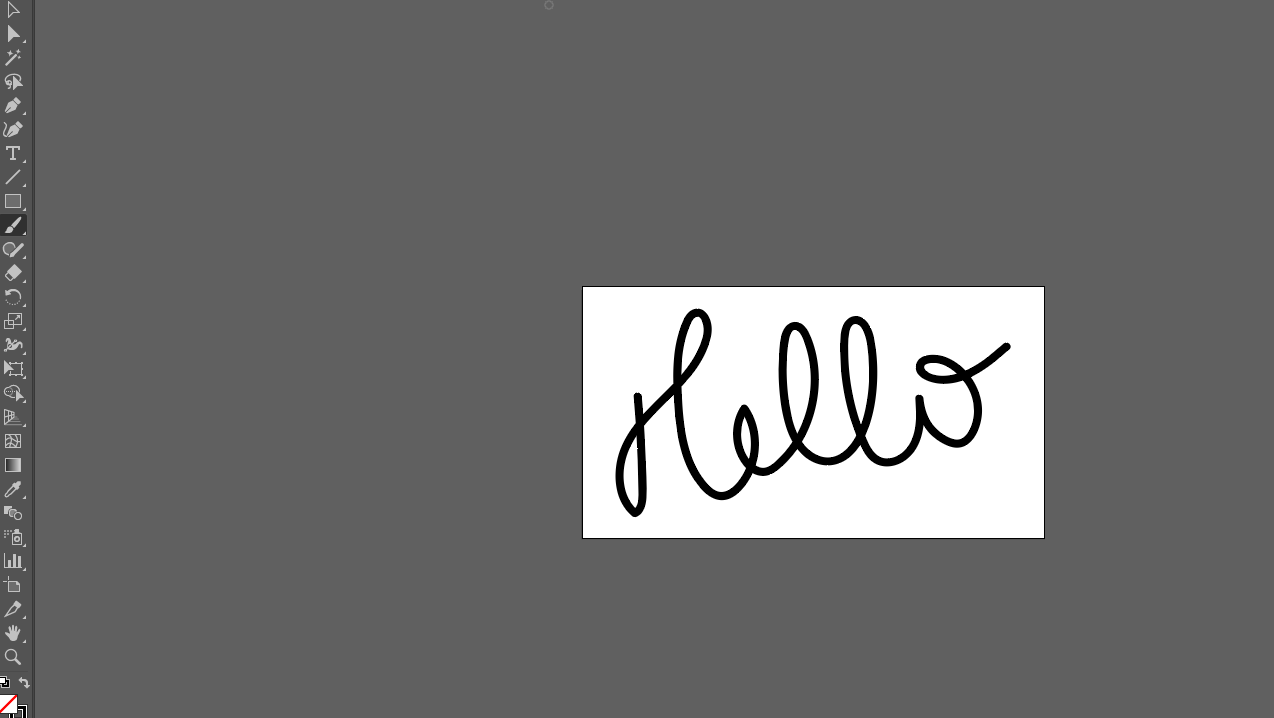
1. Create your logo with your desired font using the text tool, with your chosen proportion, and padding.
2. Once, you’re done, you will need to vectorize it. Select your text with the selection tool
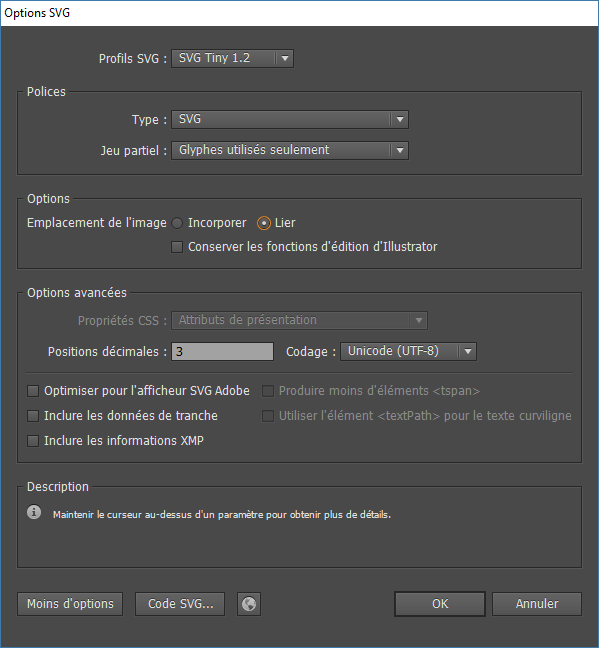
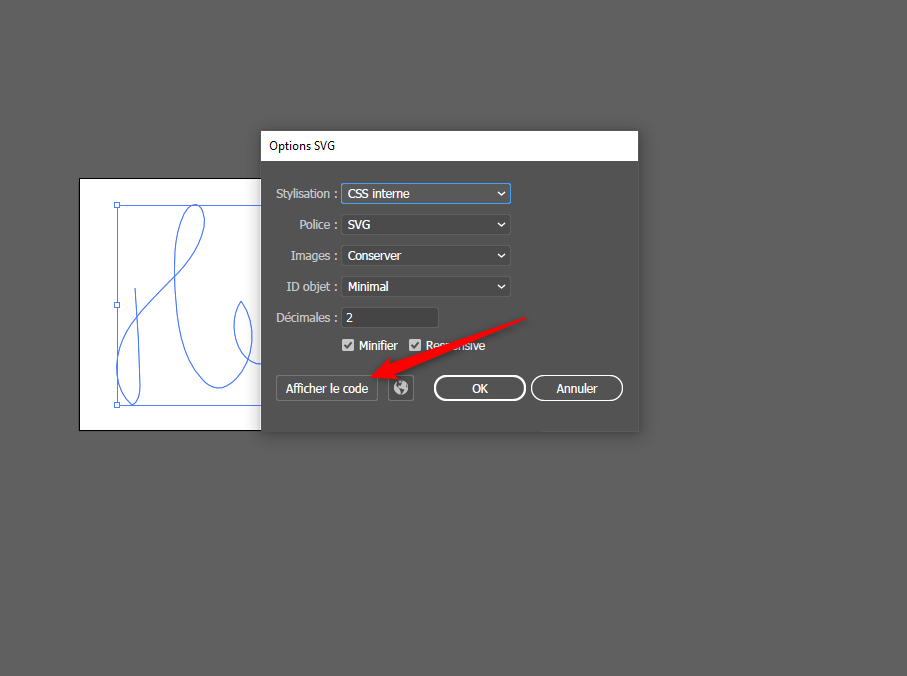
3. Finally, export your SVG with “File” > “Save as..” and choose the SVG format using the following settings:
8. Increasing the WordPress Memory Limit
If your site is having memory limit issues, you may be able to adjust this yourself – or, you may need to speak with your host. To adjust it on your own, here are some things you can try:
1. Edit your wp-config.php file.
Add this to the very bottom, right before the line that says, “Happy Blogging”:
define( 'WP_MEMORY_LIMIT', '256M' );
WordPress memory can be different from the server – you need to set this regardless of server memory settings
If you have access to your PHP.ini file, change the line in PHP.ini
If your line shows 64M try 128M:
memory_limit = 256M ; Maximum amount of memory a script may consume
3. Edit your .htaccess file.
If you don’t have access to PHP.ini try adding this to an .htaccess file:
php_value memory_limit 256M
4. If none of the above works then you would need to talk to your host about having them increase your memory limit.
9. Increasing the PHP Max Input Vars
The PHP Max Input Vars is the maximum number of variables your server can use for a single function. To work properly with a modern WordPress theme set this value to 3000. Lower values can create problems such lost data in your Theme Options, Widgets disappear etc. A common issue that may occur with a low max input vars in menu items not saving.
How to increase the PHP Max Input Vars
Like the other values above, you’ll need to access and modify either the php.ini or the .htaccess files. Most hosts won’t grant you full access to modify the PHP.ini file because it affects the whole server and all the websites hosted on it. Please contact your host first to find out if they can adjust it for you.
For advanced users who have their own server setups and full access to the php.ini file, please go ahead and try Method 1 first before the other method. For standard users, we encourage you to try Method 2 instead.
1 Method: edit the PHP.ini file
NOTE: many shared hosts prohibit you from having direct access to the PHP.ini file. Only do this method if you have direct access to your PHP.ini file or if you’re on your local host.
Locate your PHP.ini file. If you can’t find it, then you can create your own PHP.ini file in the root folder of your WordPress installation.
If you find your existing PHP.ini, open the file and locate the following line of code (xx represents a number): max_input_vars = xx; And set it to your desired limit. For example, 3000.
If you created your own PHP.ini file, then add the same code inside it: max_input_vars = 3000; Simply change the value to the recommended value. For example, 3000.
Save your changes, and reboot your local host or your server.
2 Method: edit the .HTACCESS file
NOTE: make sure to back up your .htaccess file before editing.
Locate your .htaccess file which is usually in the root folder of your WordPress installation. If you can’t find it, it may be because it’s hidden. Here’s a tutorial for Windows and a tutorial for Mac on how to reveal hidden files on your computer.
Open the .htaccess file with a text editor program (Notepad or TextEdit) and add the following line of code: php_value max_input_vars 3000
or the following if you have the suhosin security patch:
php_value suhosin.request.max_vars 3000
php_value suhosin.post.max_vars 3000
Simply change the value to the recommended value. For example, 3000.
Save the file and refresh your website.
10. Increasing the Upload Size Limit
Upload an audio file or a video file can a be a problem if your server has a low upload maximum size limit. (e.g 4M).
Here is a way to work around this.
Use the following tip if you need to increase the upload_max_filesize on your web server, especially if you are not able to directly access/edit the php.ini file.
1. Create a new file and name it php.ini (the name and the extension are very important).
2. Open it with any text editor and paste the following lines:
upload_max_filesize = 40M
post_max_size = 40M
3/ Then, save the file and upload it into your wp-admin folder.
Tested on 1&1 and Bluehost.
If it doesn’t work, contact your hosting provider.
Additionally, you can check this post to find more ways to increase your max upload size.
11. Update your PHP version
PHP is the most popular server-side scripting language, powering millions of websites. If you got to this page from the notice in your theme, your server is running an outdated and unmaintained version of PHP. Not only is your website’s performance (a lot) lower than it should be, you may be running into things not working as you expect and you’re also potentially open to security vulnerabilities!
What is PHP?
PHP is a scripting language which most likely powers your WordPress website. PHP, like all software, gets updated over time to patch security issues and improve its features. And like other software, it’s important to keep your PHP version up to date.
Updating your PHP version
In most cases, you cannot update the PHP version yourself and need to contact your host about this. The upgrade process is an easy process and should be something your host can do for you without impacting your website or charging you a fee. Here’s a letter you can send to your hosting company:
Dear host,
I’m running a WordPress website on one of your servers and my WordPress theme has recommended using at least PHP 7.4. WordPress has listed PHP 7.4 as the recommended version on n their requirements page: https://wordpress.org/about/requirements/
Can you please let me know if my hosting supports PHP 7.4 or higher and how I can upgrade?
Looking forward to your reply.
My host doesn’t support PHP 7.4
If your host doesn’t support PHP 7.4 or higher, we recommend you find a host that does. WordPress have a list of WordPress hosting solutions we recommend and all support PHP 5.6 or higher. If you contact another host, be sure to ask them which PHP version your website will run on before purchasing.
To increase the Server Memory Limit, you’ll need to access and modify certain files such as the php.ini file. Most hosts won’t grant you full access to modify the PHP.ini file because it affects the whole server and all the websites hosted on it. Generally you can’t modify the Server Memory Limit on low budget hosts. Please contact your host first to find out if they can adjust it for you.
13. Transform your playlist into a streaming player
If you have one of our recent music themes that comes with the Wolf Playlist plugin, it is possible to transform one of your playlist into a radio/streaming player.
To achive this, you will need to use the child theme included in your theme package, so you will be able to update the parent theme in the future if needed without loosing the modifications.
1. First, simply create a playlist, insert any mp3 file, name it by the title you want, and note the playlist ID.
2. Open your child theme functions.php file, copy and paste the code linked below, and replace the first two lines by your own playlist ID and streaming URL.
Now this playlist will be used to play your audio stream.
14. Import Demo Content Manually
If you want to import the demo data manually, or if your theme doesn’t offer the “one-click import” feature (yet), you can import the demo content the old fashion way using the WordPress Importer tool.
In your theme package, you will find a link to download the demo data files. Follow this link, upload the zip folder, and extract it using an archiver (WinRAR, WinZip etc..). You will find 3 files and a folder in the extracted archive.
content.xml – The file containing all pages, medias etc…
customizer.dat – The customizer settings.
widgets.wie – The widget settings.
Import the content
In your admin panel, go to “Tools” -> “Import”.
Choose the WordPress option (last one)
Select the content.xml file
Hit the “upload file and import” button and follow the instructions
Note that some of our demo data files are huge and you may encounter issues if your server settings are too low, especially max_execution_time, post_max_size, and upload_max_filesize settings (read more).
After testing several alternatives to the default WordPress importer, we found that the WordPress-Importer v2 plugin works fine even for hosts with low server settings. To use this plugin instead of the default importer plugin, deactivate "WordPress Importer" and install and activate this one instead.
Note that during the content import using WordPress Importer v2, even if the progress bar doesn't move, please wait until it says the posts have been imported.
WordPress Importer v2 and Elementor
It seems that WP Importer v2 sometimes imports content from Elementor incorrectly. The solution is
First, use WordPress Importer to import the content without importing the media (don't check the import media option)
Then use WP importer 2 to import the media. You can use the same content.xml file (it shouldn't re-import existing content, or use the medias.xml file that you will find in the demo content package)
Import the customizer settings
All customizer mods are automatically set on theme activation, just like the demo. But if you need to reset them for some reason, or if your theme includes different demos with different customizer mod sets, you may want to import them. To do so, install the Customizer Export/Import plugin.
In your admin panel, go to “Appearance” -> “Customize” or click on the “Customize” link in your front-end admin bar
Navigate to the “Export/Import” tab
Click the “browse” button and select the customizer.dat file
WP_DEBUG is a PHP constant (a permanent global variable) that can be used to trigger the "debug" mode throughout WordPress and display error messages.
To enable the debug mode, open the wp-config.php file at the root if your WordPress installation and set the WP_DEBUG value to true.
define('WP_DEBUG', true);
You should find this line at the end of the wp-config.php file above the line that says
/* That's all, stop editing! Happy blogging. */
16. Add Custom Fonts to Your Theme
To import custom fonts to your theme, use the child theme included in your theme package.
Your fonts must be in web format, meaning you must have one or several font files for each font (ttf, wotf format, etc.) and a CSS snippet to include.
To be able to use your new font in the customizer and page builder element settings, you need to add a custom function in your child theme functions.php
Here is an example with the Roboto font. We will use the Font Squirrel web generator tool to generate a font package.
1. Import the font files in your child theme. We recommend copying the files into a assets/fonts folder of your theme.
2. Paste the CSS import snippet into your child theme style.css file
To ensure that WordPress functions properly with our themes, you must have the PHP cURL extension installed and enabled on your server.
The cURL extension is a basic server function necessary for making network requests, such as retrieving external data or communicating with other services.
If cURL is not enabled, please contact your hosting provider and request that they enable the cURL PHP extension.
18. Add Currency to Currency Switcher
If your theme supports currency switcher via our Wolf Currency Switcher plugin, you are able to add/remove currencies using this simple trick.
You must use the child theme included in your theme package and add the following function at the end of the child theme functions.php file.
Some hosting provider may prevent the acess of third party URL. It is recommended to contact your hoser if you have any issue.
19. Update Slider Revolution
Most of our themes provide a full version of Slider Revolution.
Any time the plugin is updated, you will find the latest version in the config/plugins (or includes/admin/plugins) folder of your theme.
Please note that we need several days to test the compatibility with our themes, and if the new plugin version doesn't include important updates, it may take more time before we update all our themes.
To update the plugin, you can deactivate & delete the plugin from your WordPress plugin panel, then reinstall the new version via the "Appearance" > "Install Plugins" panel.
Alternatively, you can reinstall it by uploading the new revslider.zip file located in the config/plugins folder of your last version of the theme package.
Or, you can replace the wp-content/plugins/revslider folder on your server via FTP with the content of the js_composer.zip file.
With our new Wolf Core plugin, you can create an animated SVG using the "Animated SVG" elementor widget.
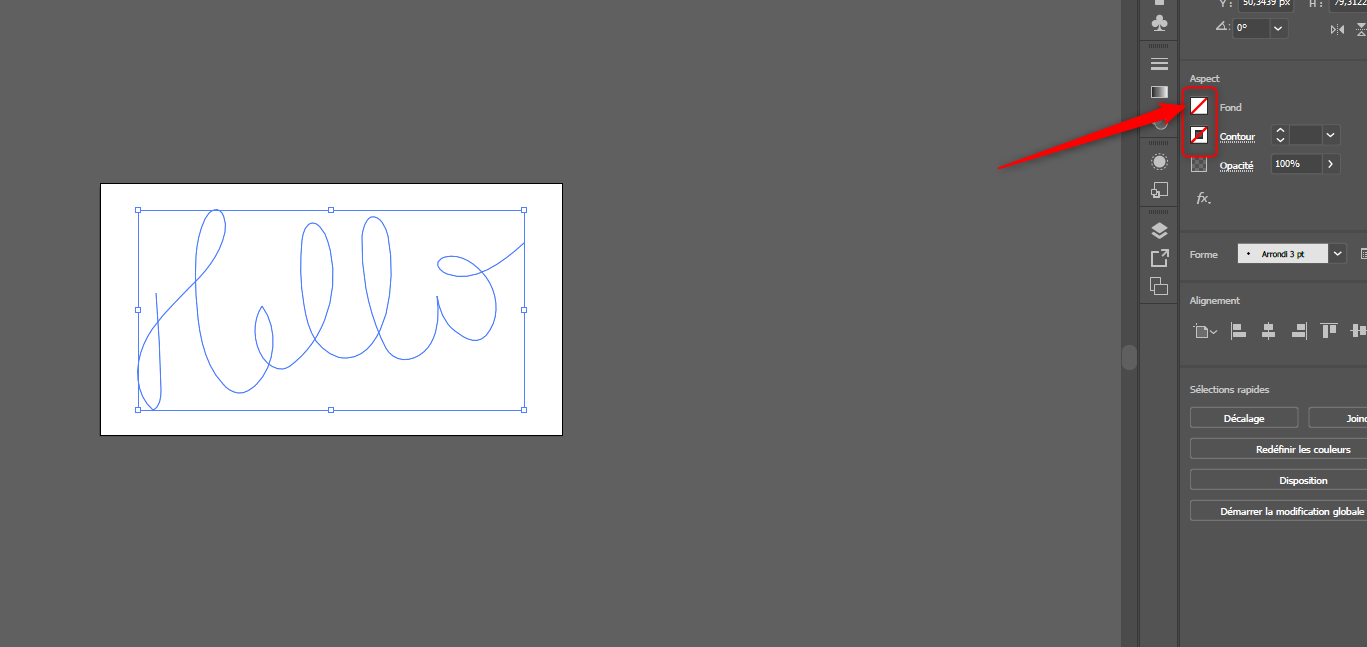
In order to work correctly, your SVG illustration must be a simple path with no stroke and fill. It means once you're done, you need to remove stroke and fill from your shape.
First draw your shape, preferable a simple one using the brush tool.
Next remove the fill and stroke so you can only have a path left.
Then click on File > Export > Export as... and select any location, use the following settings and hit the "Show code" button.
Finally simply copy and paste the generated code into the animated SVG widgets settings.
21. How to Increase Your Loading Speed
Website speed is a really important factor that can impact the number of visitors on your website. It has been proven many times that if your loading speed is too slow, people will leave your site even before the page has finished loading.
You can use online tools such as Pingdom to analyze your loading speed
Your images must be optimized for the web: 2000 width and 2500 pixels height max and around 500Ko
Once you're all good on this side, and your theme is installed and running, you will probably notice that it is slower than the demo. This is because, like most websites in production, we use a cache system to optimize the loading speed and make things run faster.
Here are the 3 plugins used on all our demos to increase the loading speed and make our websites run faster even for pages with a lot of content.
Autoptimize(Important: uncheck the "Also aggregate inline CSS option" and add this line) in the "Exclude scripts from Autoptimize" option)
Additionally, you can use a CDN (Content Delivery Network) to server your static assets (images, videos etc..) from another source and make our pages even faster.