11. Activate Wolf Page Builder Extension or Wolf Core plugin
1. Before Getting Started
Use the documentation
All of our themes as any kind of technical products have a documentation to follow. Some of our themes have many features and tons of options for virtually various needs depending on the theme you chose. Do not expect to be able to use the most of this tools without reading the documentation. Use the documentation and you will be able to create amazing professional looking websites.
Server Requirements
Most of the issues users may experience are related to Server Requirements not respected. Issues you may encounter, such as demo content importing fails, menu partially not saving, page not rendered correctly and other oddity are related to excessively low PHP configuration limit settings of the server. Please note though that many hosts will try to keep the limits low to save their resources. You are paying for it, and you should expect to be getting your money’s worth. These values are typically lower if you choose a low budget host. Before starting, right after installing the theme, check your System Status or use the WordPress phpinfo() plugin to check your server settings. To avoid any trouble, see our list of recommended hosts.
Demo Contents
Once you install the demo content, you will have a replica of the theme demo site. To make your workflow as smooth as possible, we suggest installing the entire demo, select the pages you need, and remove the rest. Remember, that if you choose a theme containing let’s say portfolio items, you will have to install the related Portfolio plugin before importing the demo content.
Light and Dark skins
When using one of our themes, especially the ones that includes a page builder, you will see frequent references to "Light" and "Dark" skins. Skins are settings that allow you to switch your text color in accordance with the background and design you have in place. A Light skin setting refers to dark text on a bright background (usually used in bright layout). A Dark skin setting, on the other hand, features bright text on a dark background (usually used in dark layout). The skin system makes it much easier to create sections featuring contrast.
Theme Settings
Theme settings are the backbone of our themes. They give you full control over your website and allow you to customize the design without modifying a single line of code. The three major groups of options you can set in our themes are the Customizer Mods, the Page Options and the Additional Options under the "Appearance" WordPress admin menu.
Customizer Mods
The Customizer Mods are responsible for the global appearance of the entire website; unless otherwise specified in Page Options. They are accessible in the “Appearance” > “Customizer” from your admin panel, or directly by clicking on “Customize” in the frontend admin bar. They use the WordPress customizer with its awesome live preview feature.
Page Options
The Page Options are located inside every page, post, product single page. You can override particular Customizer Mods for single page diversification (like the Page Header for example).
Additional Options
Additinoal Options are complementary to the Customizer mods. They can be found under the "Appearance" WordPress admin menu. They most likely include the Google Fonts loader, maintenance page and so on…
Do you want us to take care of everything for you? Learn more
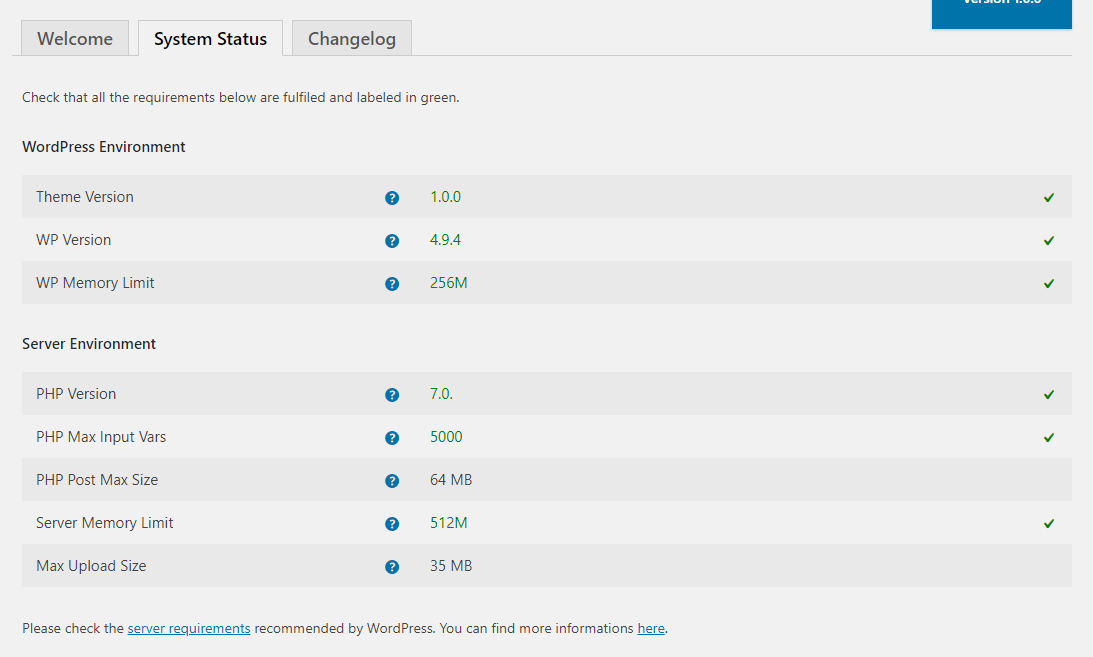
3. System Status
Our most recent themes come with a system status table directly into your WordPress Dashboard (in the admin “Appearance” -> “About the Theme” panel).
To be able to acess the system status table, you need to be able to install and activate plugins (more info about WordPress capabilities here).
If you have red errors indicating problems are present, it is likely you are not in compliance with the Server Requirements for a modern WordPress installation. Please consider that most of our themes, as any other Premium themes, come packed with a Page Builder and full options set that need decent server performances to run smoothly. Any red error has a link that points to a tutorial showing how to fix the value to meet the requirements.
You can always contact your host to have them adjusted as needed. Please note though that many hosts will try to keep the limits low to save their resources. You are paying for it however, and you should expect to be getting your money’s worth. These values are typically lower if you choose a low budget host.
The most important values you need to be compliant are:
WP Memory Limit: the WP Memory Limit is the maximum amount of memory (RAM) that your site can use at one time. When you reach your Memory Limit, you’ll encounter a fatal error. (read more)
Max Input Vars: the PHP Max Input Vars is the maximum number of variables your server can use. Lower values can create issues such lost data in your Theme Options, Widgets disappear etc. (read more)
System Status Check with WordPress phpinfo() Plugin
If the theme you chose doesn’t include this feature, no worries, you can use the WordPress phpinfo() plugin.
Once installed, go to the plugin phpinfo() page (admin “Settings” -> phpinfo() ).
The first column refers to your installation value, and the second column refers to the limits of your host. The latter values are often lower if you have selected a cheaper hosting package.
You can always contact your host to ask what the current settings are, and have them adjusted if necessary. Some hosts will try to keep PHP limits low to conserve resources. Since are paying for those resources, you should rightfully expect to be getting your money’s worth.
4. Plugin Installation
When you install or update one of our themes, you will receive a WordPress notification message advising you to install and activate the required and recommended plugins. Follow the link provided in the notifications and install the plugins.
Do you want us to take care of everything for you? Learn more
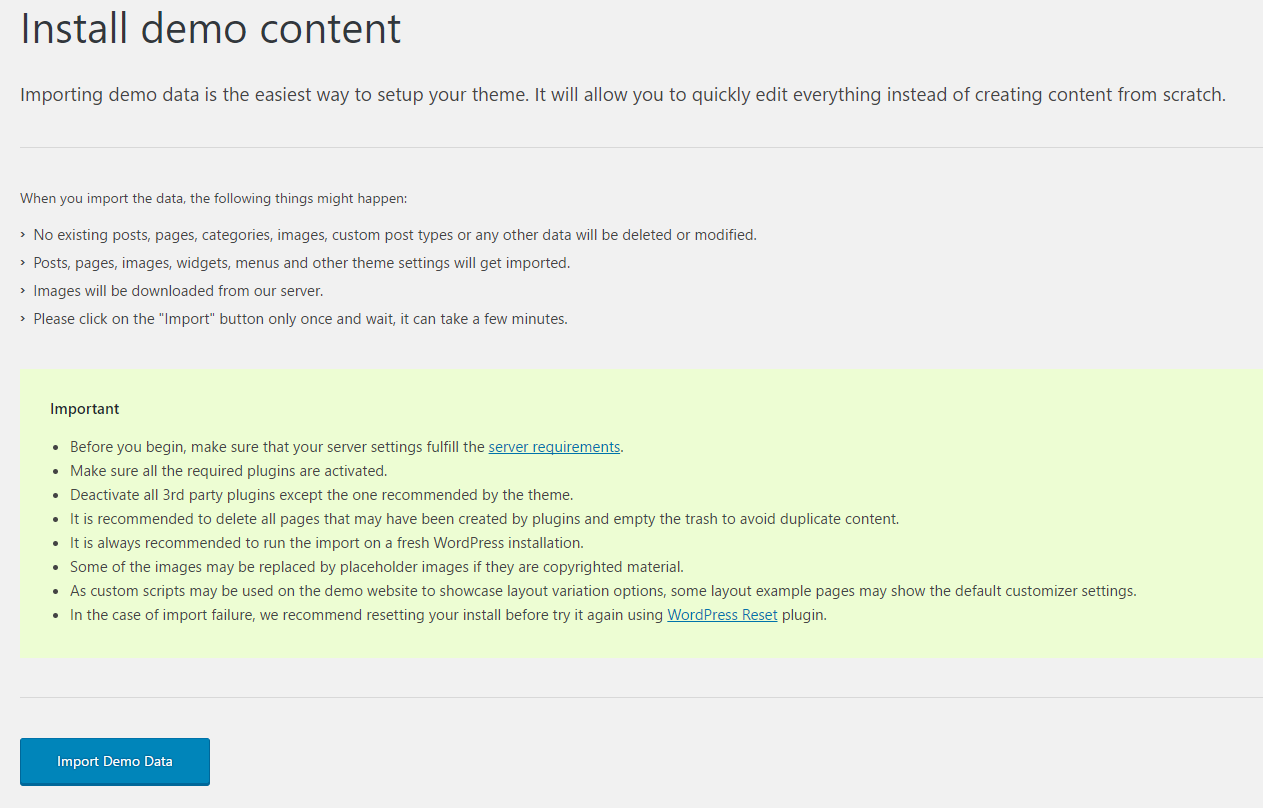
5. Import Demo Data
One-Click Demo Import
Importing the demo data is the easiest way to set up your theme. It will allow you to quickly edit everything instead of creating content from scratch. In most of our themes, you can install the whole demo content through the “Import Demo Data” panel.
Make sure that you have entered your theme purchase code to authorize Wolf WPBakery Page Builder Extension.
The Site Language must be set to "English (United States)" in the "Settings" > "General" panel. You will be able to change it afterwards
Deactivate all 3rd party plugins except the one recommended by the theme.
You must install all the required plugins after theme activation. You may be invited to install default plugin pages. You must decline all plugin page installations to avoid duplicate pages.
Once all your plugins are installed, go to the “Appearance” > “Import Demo Data” panel, select a demo click the “Import” button and wait, it can take a while.
Import Demo Content Manually
If you want to import the demo data manually, or if you have trouble using the 1-click importer please refer to this article:
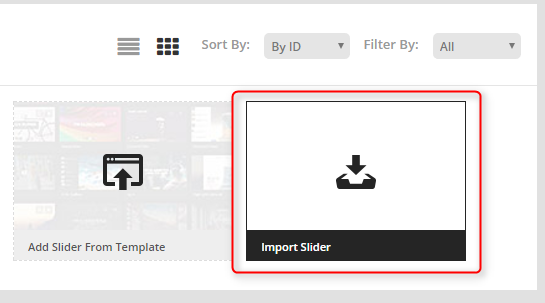
You will find the demo sliders in the revslider folder.
To import a slider, navigate to your admin Slider Revolution panel, click on the "Import Slider" icon and select your chosen slider zip file from the "revslider" folder.
You should be invited to install and activate this plugin on theme activation (at least on all our recent themes), so it is recommended to install it if you want to update the theme automatically.
Once the plugin is installed, simply go to the Envato market panel and follow the instruction to set up your Envato account.
You will get notified in your admin dashboard every time a new version of the theme is available. Then, simply follow the link in the notification message and update the theme in a single click in the Envato market plugin page.
All our theme packages include a child theme. A WordPress child theme allows you to apply custom code changes to your site. Using a child theme ensures your customizations will not be overwritten, even if you update the parent theme.
For most cases, you won’t need a child theme if you just want to add a couple of lines of CSS for a style adjustment. You can add custom CSS styles directly in the Customizer “Additional CSS” tab (since WordPress 4.7.2). But if you need more advanced customizations, like more CSS rules to overwrite the styles of the theme or even add your own PHP functions, it is strongly recommended to use a child theme.
How to set up your own Child Theme
Although child themes can be a great way to add custom changes to your theme, they are most often used to customize core code taken from the parent theme. Because of this, please be aware that customizations of this nature fall outside our scope of support, and we will be unable to assist you with any issues that may arise. To use the child theme, find the “themename-child” folder in your theme package and upload it to your wp-content/themes folder through FTP. As it is mainly made to be edited, we didn’t include it as a zip file, so you will have to install it manually. Once installed and activated, it will automatically inherit all parent theme features, functions, and styles.
Do you want us to take care of everything for you? Learn more
11. Activate Wolf Page Builder Extension or Wolf Core plugin
Once the theme and plugins are installed you have a few days to activate the Wolf WPBakery Page Builder Extension or Wolf Core plugin to verify your purchase.
To do so, go into the Appearance > About the Theme panel and click on the "License" tab.
Simply enter your theme purchase code to activate the plugin.